UPDATED August, 2018
Web push, while no longer considered brand new, is still an innovative marketing channel that has been rapidly gaining attention and credibility as one of the most effective and powerful ways to re-engage website visitors. There is a lot to learn about this form of digital marketing, especially if you are new to the world of web push. Thankfully, we have put together this guide that will walk you through all you need to know about website push notifications including what they are, how they are installed, how to send them, and more.
Let’s start off with the basics. Website push notifications are short messages that are sent to users that have opted in to receive them (more on that process later). They have the same look as push notifications you are used to seeing on your smartphone, but instead are sent and received on desktop or laptop computers (as well as mobile devices). These messages feature an icon, some text, a call-to-action, and in some cases, a push notification image.
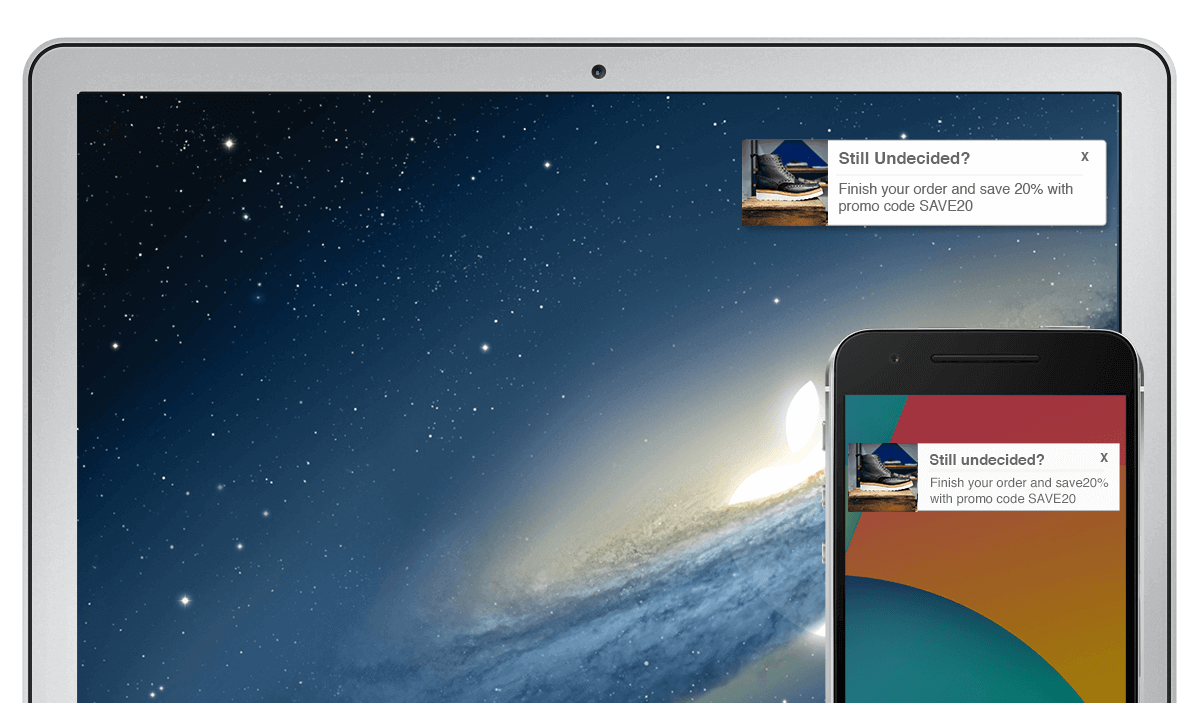
As you can see, website push notifications look and operate exactly the same as push notifications you are used to seeing. However, with push notifications you are restricted to sending messages to mobile devices, but with web push, you can target your audience both on mobile and desktop devices. In fact, users do not even have to have their browser open in order to view your notification. This increased visibility is just part of what makes web push such a powerful marketing tool. Website push notifications are currently supported on these browsers: Chrome, Safari, Firefox, Opera, and Samsung Internet.

Here’s something else to fall in love with when it comes to web push: it is incredibly easy to install these notifications- both for companies using them and for users who wish to receive them. We’ll talk more later about the process for customers, but for now let’s focus on the other end of things. There are three ways you may install Aimtell push notifications:
After you have set up and installed Aimtell comes the fun part: creating and sending out your campaigns! You will manage all of your web push campaigns via your Aimtell dashboard.

Once you have installed Aimtell, users visiting your website will start being prompted to subscribe to your notifications. Here’s the good news: it only takes one click to turn a user into a subscriber.
Seriously.
When a new user enters your website they will be prompted to subscribe to your notifications. If they want to opt-in, they press allow.
That’s it.
No more typing in personal info or email addresses or clicking a link to confirm. It couldn’t be any easier than this.
The pop-up box a user will see once you have installed Aimtell is called the opt-in prompt. The default setting is to have the prompt display automatically when a user lands at any page of your website. If you want more control over your opt-in prompt, you’re in luck.

Our Prompt Management feature allows you to control when your users are prompted to subscribe to your notifications. Users may be prompted when visiting a certain page of your website, or when clicking a certain link, image, or button. If you need help setting up these features, read our guides on prompt management and triggering via a link/image/button.
When a user chooses to opt in to your notifications they are automatically added as a subscriber. From your dashboard you may view your subscribers and can choose to group them into certain segments.
A segment is a group of people that you can market to (as opposed to marketing to your entire list of subscribers). You can segment people based on a huge variety of conditions such as their geographical location, links they visit, or last time they viewed your website. For example, you could have a segment of people located in California, a segment for people who have viewed your blog, and a segment for people who haven’t visited your website in 7 days. Once you create a segment, people who fit the given criteria will automatically be added (or removed) from the segment.

Our smart audience segmentation tool gives you the option to easily create powerful segments of people based on multiple conditions. Keep in mind the more specific your audience is, the more success you are likely to have with your campaigns, so smart segmentation is a must. Read our guide to learn a lot more about creating segments.
Sending website push notifications is easy. From your dashboard you will create your campaigns and schedule them to send.

Here is what your dashboard looks like. To send a campaign you will click on ‘Notifications’ on the sidebar and then click ‘Manual Notifications.’ Clicking that will bring you to your list of campaigns. Select ‘New Campaign’ to get started. You will first type in a name for your campaign and then click ‘Create Campaign.’

This window shows all of your customization options for your campaigns. To start off, give your campaign a title, custom icon, large image (if you want), and body text. Get creative with your campaigns to come up with something that will really catch users’ attention. Aimtell users have had a lot of success utilizing emojis in their campaigns- read up on our emoji marketing guide for some ideas.
You will notice to the right of the screen the live preview window that will show you a general idea of what your notification will look like as you input this information. You can also hit ‘send test push’ to see a true representation of how your campaign will look. Don’t forget to also input your destination URL.
The tabs across the top allow you to customize everything else for your campaign- choose your segments in the targeting tab, turn on conversion tracking to monitor how many subscribers convert at your site as a result of your notification, set an optional expiration time for your campaign (here’s when that may be important), and finally, schedule your campaign! Campaigns can either deliver once or on a daily, weekly, or monthly schedule.
If you want more detailed info on setting up a campaign, click here.
When a campaign is sent, it appears on users’ desktop and mobile devices (where it shows up depends on what device they used to opt-in). When a user clicks on the notification, they will be brought to the URL you input when creating the campaign.

Of course! No marketing strategy is worth it if it doesn’t produce results, right? Easily check results for any of your campaigns from your dashboard by viewing your list of campaigns and selecting ‘View Results’ next to the campaign you wish to analyze.
Your results will tell you the number of messages that were sent as well as the number that were clicked. If you enabled conversion tracking, you will also be able to view how many conversions there were. You can also filter your results based on segments you sent to.
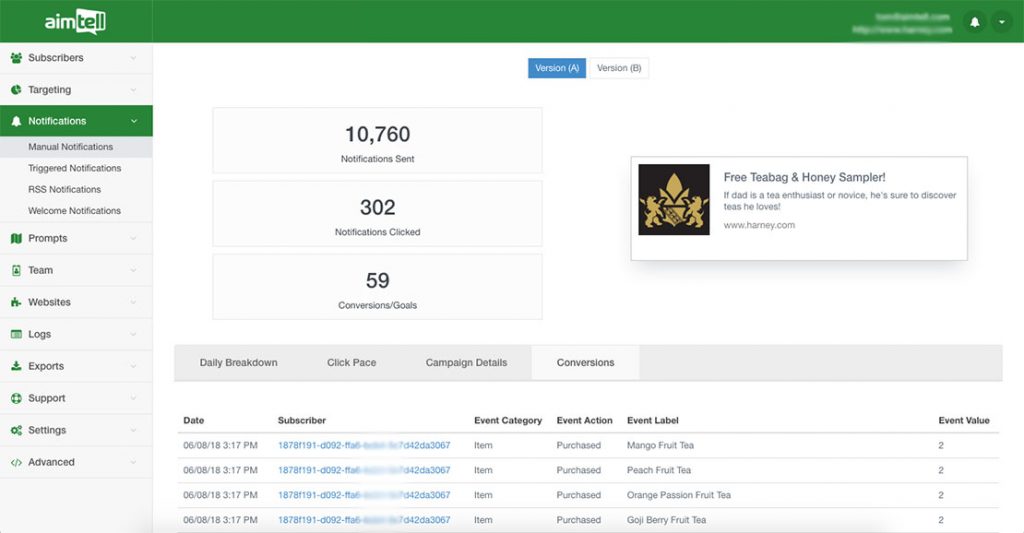
If you have enabled conversion tracking you can see the total number of conversions, as well as a breakdown of each conversion that happened as a direct result of your web push campaign. You can read our documentation on conversion tracking for more help getting it set up.
Now that we’ve covered the basics, here are several advanced features that you may wish to utilize in your campaigns:

There you have it! You should now have a pretty good understanding of what website push notifications are, how they look, and how to send them. Pretty easy, right? In fact, you can get started sending website push notifications in as little as five minutes. Start your Aimtell free trial today.
Have a specific question we didn’t answer here? No problem. Send us a message letting us know.