We recently held a webinar on getting started with web push notifications and wanted to share the information with all of you! As a relatively new marketing strategy, we understand that some of you may have questions about how to actually get up and running with web push. We totally understand, and if that sounds like you, this is the post for you.
Keep reading for our top tips on getting started with web push notifications, as well as a complete overview of what push notifications are and how they work, or head to the bottom of this article if you prefer to view the webinar instead.
To start off, it’s important to point out that website push notifications are different from app notifications because they are based from a website, a domain, and are sent to users that have opted in to receive them.

In terms of deliverability, they can be sent to mobile and desktop devices. There’s a lot of variation and things that you can do. You can have a title, a body message, and up to two calls to actions. You can even have custom icons and custom large images, with sizes up to 500 by 300 pixels.
Best of all, everything is customized with your brand, domain, and images.
A bit of history about push notifications, like we mentioned, they’re a relatively new marketing channel. In fact, this year we are turning five years old- both Aimtell and web push notifications, as we’ve been around since the start.
Five years is a relatively short amount of time, especially when you compare that to email or SMS marketing channels. There’s definitely pros to using web push notifications. Keep in mind that this is not meant to derail email or speak bad about email or SMS marketing, but instead Aimtell and web push were created based upon common pain points from email and SMS.
What are those pain points? To name a few, there’s no spam folder with web push notifications. You don’t need to try and get into a subscriber’s primary inbox, meaning there is no need to worry about if a subscriber will receive your message, or even if they receive it, if they are actually going to open it. No. 99% of people nowadays have a phone. So you’re going to be guaranteed that their notifications are coming across their phone.
There’s also no data sharing. Another big concern at the moment with email is, “I don’t want to give my personal email. I don’t want that to be shared around.” The great news with web push is that when someone opts in, a subscriber ID is made anonymous. There’s no data to share. And this is a big one, especially compared to SMS. There’s no compliance laws really, or very few. And in any case, it’s not you, it’s the browsers that have to adhere to these compliance guidelines. However, with SMS, if you don’t have a clear unsubscribe route in SMS, you can potentially rack up thousands of dollars in fines.
These are just a few reasons why you should consider web push notifications, what they are, and why they’re useful. Now let’s get into how they operate.

Your opt-in: this is the absolute key when it comes to web push notifications and one of the main perks and reasons why you should get started with them. It’s a one click opt-in. Once they click, they generate an anonymous subscriber ID. There’s no personal data entry. There’s no asking for emails. And there’s no asking for numbers. It’s literally a click of a button.
Another really great concept to grasp here is although you control the subscriber ID, it’s very easy for your user to unsubscribe. There’s no unsubscribe link or stop messaging that you need to have in your messages. Users can unsubscribe easily at their choosing.
Let’s show an example site. Below is a native opt-in prompt to Chrome. Blinds.com is a Home Depot subsidiary. They use Aimtell here and they’ve opted to use a very simple one-click opt-in:
 So this is all it is. You go to their site and this is what it looks like. One click allow, a subscriber ID has been made, and suddenly some data has been tracked to that subscriber ID.
Another strategy that you can use is custom opt-in prompts. In this instance, instead of a one click opt-in, this is two clicks. For an example of this, here is Death Wish Coffee Company:

This is a great and very simple strategy. What they’ve done, they’ve used Aimtell to make a custom opt-in prompt and it’s Death Wish Coffee and you- Want to receive notifications on deals and sales? Nope, or hell yeah.
It perfectly fits their brand. They’ve done a great job with this and the result is likely to boost their opt ins, inspiring their audience to click on hell yeah. Once they hit ‘hell yeah’ the native prompt shows, they hit allow, and that is it. That’s an example of a two click opt-in.
Once someone opts in, some data has been tracked back on the site. Here is some basic stuff that is being tracked, and as you can see, no personal identifiable information is tracked just yet, but you can track that if you’d like:
 Very simple stuff is tracked, things like whether they are on Chrome or Safari, their language, whether on mobile, and location as well. Geocaching is all done with Google Analytics and it’s exactly the same with Aimtell as well. It’s all tracked automatically for you.
So let’s say someone has opted in, they are now on your site, on your subscriber list, and in your Aimtell dashboard. Now the question becomes, why? Why are web push notifications useful now that I’ve got the opt-in?
Obviously the big one that we just covered is the comparison with email or SMS. With web push, the user feels like they own the data, which is so key in today’s day and age. For example, with businesses having to deal with GDPR compliance laws, it was a nightmare and was sink or swim basically when it came to internet marketing. But the great part is that Aimtell is completely GDPR compliant because the user owns the subscribe-unsubscribe button as well as whatever data you track, because it’s all anonymously tracked to the subscriber ID.
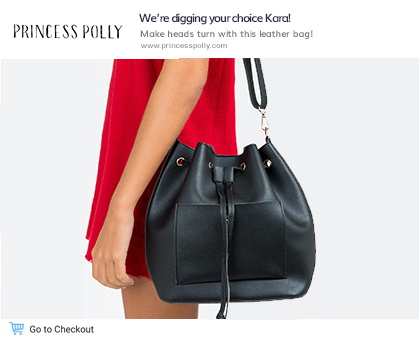
Another big advantage of web push is brand awareness. You can easily get your brand in front of your users. The example we like to use here is, let’s say you are a women’s fashion ecommerce site, and a user opts in to your site and they’re browsing. Eventually they are like, “Okay, now I want to look at a different site.”
At this point, they go to a competitor site. All of a sudden, if you set it up correctly, you can send them a notification 15 minutes after they opt-in (or whatever time you choose, it may be a day after they opt in) and they can even be on a competitor site, and your brand can pop across the screen, or cause their phone to vibrate, and you can get the top of the mind marketing and awareness- it’s so key to begin to capitalize upon that.
Best of all, you can even secure that brand awareness when they’re not even near your website or even on their phone. A subscriber could be outside doing yard work and their phone buzzes and they see a notification from your website. Top of the mind marketing brand awareness.
Boosting traffic and engagement: this is highly important. With web push, there’s no inbox to check. There’s no texts to check or links to click on. All you have to do is tap on the notification from the lock screen or from your desktop and you can get traffic back to your site, get that engagement up, and improve your retention efforts.
Next up: growing your subscriber list. The great news is that this is far easier to do than growing an email or SMS list. We’ve already covered the opt-in prompts- it’s one click. There’s no data to share. That means that growing your subscriber list is definitely easier to do. And of course, converting more visitors by using hyper-personalized messages sent to the right visitor at the right time. We’ll cover that in more detail later on.
Another great reason to use web push is because it works in every step of your marketing funnel, whether that be for ecommerce, a publisher, a sports or betting site, or even if you run a content site, say a recipe site, there’s value for push notifications at every step.

Say you’re a pre-lead that mainly focuses on email marketing and you’re trying to get people to sign up for emails. For example, say they visit your site and opt-in to notifications, but they don’t give their email. You can send them a notification to say, “Hey, you didn’t enter your email. Enter your email and get 20% off.” This will work all the way down to the bottom of your marketing funnel with people who are post conversion.
For another example, let’s say you’re a company that sells monthly supplies of protein powder. The goal is for your subscribers to come back to your site and buy next month’s protein powder. You can track their purchases, send them an automatic notification 30 days after they purchased saying, “Hey, it’s that time again to buy protein powder.”
As we said, all the way from pre-lead to post conversions- engage your subscribers at the top and bottom of your funnel with web push notifications!
Now let’s get into how you use Aimtell web push notifications specifically. We like to break it down into three easy steps: installation, collecting subscribers (beginning to get users to opt in), and then engaging those subscribers (sending push notifications).
Here’s a quick example of just how easy it is to add a website on Aimtell. Oftentimes people think it’s a lot more confusing, but it really isn’t. Make sure to include the HTTPS in your web address, as it’s worth noting that web push notifications only work when your site is SSL secured. Make sure you have an HTTPS site address versus just HTTP.
 All you need to do to get started is add your site name and your domain, for example https://www.examplesite.com. Also go ahead and add your icon. This is important because if you don’t have one set on specific campaigns, this is the icon that will be sent, so it’s important to have your brand logo added here.
Once that is all set up, we then go to integrating Aimtell. There’s a few different ways that you can integrate yourself. If you have a WordPress or Shopify site, you want to click the buttons with respect to whatever CMS you use. If you’re a WordPress site, we’ve got a plugin. So don’t install with Javascript, use the plugin. If you’re a Shopify user, we’ve got an app. So go and use the app. There’s no coding, nothing like that. Literally just install it, log in with the Aimtell account you just made, and it’ll link up nice and easy.

For users who are not using WordPress or Shopify, you will use Javascript. No worries though, it’s just two steps that are very easy to do. What you will do is copy and paste a tracking code and then upload a file into the root directory.

Going back to the example of blinds.com, they’ve got the code copied and pasted on the backend of their site. If we search for the aimtell-worker.js, this is what a correct installation should look like:

The easiest way to test if everything is installed correctly is to go to your site and see if you can get the opt-in. Once those two steps are done, and just to give you a time frame, if you’ve got a dev team, or if you are the dev team, this should take less than five minutes. If you aren’t on a dev team and you’re less familiar with coding, this should still only take you 10 to 15 minutes.
Feel free though to contact Aimtell support at any point and we’ll be more than happy to walk you through the steps and make sure you’re up and running and installed correctly from the get go so that there’s no deliverability issues.
Once you’ve done that, we verify it. And again, you can verify it yourself, just go to the site and see if you get the opt-in. That’s it- now you’ve got an installed site!
Just for reference, the entire install process took less than two minutes. Considering the other work as well, maybe that’s another five or ten minutes. In total, you’re looking at about 10-15 minutes to install Aimtell which is fantastic, there’s so much value there.
For the next step we’ll begin to collect subscribers and you should be one of those people. If you’ve not opted into your site, we highly recommend you go to your site and you opt-in. Just click on the allow button. Not only is this helpful in the long run to see what automatic notifications are actually sent, but it’s also useful to send test notifications to yourself. You can see your subscriber ID by heading to ‘all subscribers’ once you’ve opted in.

In the above example we haven’t opted in at this particular website, but if we had, the subscriber ID would be there and you could view all the data that we showed previously.
The next step is going to be creating a welcome notification. A welcome notification is sent immediately after a user has opted in. It doesn’t have to be anything complicated, but it will help get subscribers used to seeing your notifications. It’s very important.
 It can be something just as simple as thanks for subscribing. Consider incorporating some emojis, which is just a very quick, best practice. Did you know that notifications with emojis are 85% more likely to be clicked on? We don’t know why that happens, but it’s likely to do with the color and attention grabbing. So if you’re not using emojis, use emojis.
For the body, we put check out our latest products with the eyes emoji. For the URL, we put www.examplesite.com/new-arrivals. If you use Google Analytics, you can just click on the ‘Add UTM Parameters’ button and it will automatically give all the right stuff that you need and then just click on activate. And that’s it. If someone opts in, they’ll get this notification right away. You don’t have to overthink it, but it’s cool to get this set up and sent out.
Time for the next step. So we’ve installed Aimtell correctly. We’ve set up a welcome notification. What’s next? Well, this is where the beauty of Aimtell is because of all of the different features available to you. It’s now time to begin building out your web push strategy.
So, what are the main web push features? We’ve already talked about the single click opt-in. We’ve also already talked about the custom opt-in, the two clicks. Another big one is personalization. We touched on that earlier. You can track things like first name or cities and you can begin to use that dynamically in your web push notifications.
But really, what is important to mention is what we consider the crown jewel of Aimtell and is really what sets us apart, and that is our automation. There’s so much that you can automate with web push, whether that be via triggered or RSS notifications.
Let’s get into some specific strategies. You may want to set up a welcome drip notification. So what this means is that you send one notification immediately and you set up another one to go a day later or so on and so forth. Similar to an email drip or SMS drip, our welcome notification drips are no different. You send one initially, and then you send one a day later, then one a week later, and the triggers can vary based on what you want, whether it is based on when someone clicks on a notification or if you want to just waterfall them very basically. This is a very useful strategy to employ.
Another great strategy is utilizing personalized content in your notifications. We touched on that with first names, but also it’s important to say that targeted notifications always work better than general notifications. That’s not to say that you shouldn’t use general notifications, but rather think about how you want to start bucketing your subscribers, whether that’s by location, whether that’s by mobile or desktop, or by activity rate, whether they viewed a page on a site, and so on. Begin to personalize the notifications that your subscribers are going to get. Segment and personalize.
One of the most important things is notification timing. Timing is key. It’s so important. And here there’s two things. Think about your vertical and think about your user. If you’re a news site in the news vertical, you want to send out headlines in the morning when your subscribers are drinking their coffee and are on their phone scrolling mindlessly. This is the perfect time for a notification to pop up from you. They are likely to respond positively and click on it. So in this case, you want these notifications to be sent at 7:00, 8:00, 9:00 AM in the morning. Whatever vertical you are in, think about your timing.
Pro tip: Whatever timing you decide on, be sure to optimize by user timezone so that every subscriber receives your notifications at the time you want them to.
To go along with our strategy points, here are some web push examples to help you get started:
For ecommerce, think automated campaigns like abandoned cart notifications, item shipped notifications, or order updates. These notifications work incredibly well. Just recently, we worked with a client and helped them set up and send 10 automatic abandoned cart notifications. The results? Over one weekend they generated over $1,500 off of one abandoned cart notification. And it only took 10 minutes of work.

Bottom line, if you are an ecommerce business, abandoned cart campaigns should be your number one priority. We’ve got a template for it in our dashboard and really good documentation to help you get that set up.
Other really useful notifications include RSS feed and blog post updates. Best of all- these are automatic and all you need is an RSS feed URL. You can begin to send notifications for content, drive traffic back to your site, increase those clicks, and get users back on the site. Especially if you’re monetizing a platform, use the automatic feeds to help you get the traffic and clicks that you need.

Going back to our talk about the top and the bottom of the funnel- referral requests or review requests are great automatic campaigns to send. Best of all, you can send incentivized referral request notifications that will get you better results. Let’s say that a subscriber of yours buys a product. You can send them a notification one week later saying, “Hey, review your product here.” It’s a really easy, automatic way to get those reviews.
Finally, another idea is to create a manual repeating campaign for a weekly sale or weekly new products. If you’re not promoting new products, these repeating notifications could announce updates for your site or announcements and things like that.
Hopefully this has given you a quick start reference guide and some strategy and ideas to get going.
Let’s say you’re a brand new client and this is the first you’ve ever heard of Aimtell, what should you do? We recommend going to our website and creating an account- you can get started for free! Install Aimtell on your site like we walked through earlier and then schedule a demo with us.
One of our sales or support team members will be on a call with you and will walk you through any questions you have. Then, start sending notifications and see what’s working.
If you’re an existing client, your next steps? Optimize and adjust. If you’re seeing that certain campaigns aren’t getting many clicks, change it up a little bit, add a different emoji, use different images, and then adjust your strategy.
Question: Can I install with GTM?
Answer: So GTM is Google Tag Manager. Yes, you can. If you go to the tracking code in your dashboard you can copy the tracking code and you can install via Google Tag Manager, fairly straightforward. If you’re familiar with Google Tag Manager, you’ll know how to do that, but yes you can. As for uploading the service worker file, you still have to do that outside of it into your root directory. And the reason for that is your service worker file enables off site sending. So this means that it allows Aimtell to send if you’re not on your site. So it’s absolutely crucial for the deliverability and you need to make sure that’s on.
Question: When should I send automatic notifications?
Answer: Great question here. So obviously that’s going to be different for every vertical, different for every campaign. There’s no one answer that fits all here, unfortunately. I wish there was, but there isn’t, but some advice I can give you. Timing is key. So always be thinking about it when you create your new campaign. And the second thing is: opt-in to your own site and over time you’ll see what and when automatic notifications are sent and you can begin to use that to your advantage. Also think about the user experience. Think about when you’d want your abandoned cart notifications come through. Think about when the most opportune time for you to purchase clothes is, for example. One more word of advice, for welcome notifications, they almost always work better when they’re sent immediately.
Watch the full webinar below: