One of the most popular types of content you’ll see when it comes to various marketing strategies has to do with best practices. Best practices for social media, email marketing, PPC ads, and the list goes on.
It makes sense! Knowing the major do’s and don’ts when it comes to any type of marketing is incredibly important. This foundational type of knowledge helps when it comes to crafting your specific content strategy. While each brand will have a unique strategy, there is plenty of information that applies to everyone.
The same goes for web push. Your specific brand and marketing goals will help determine your specific web push strategy, but there are plenty of things that everyone needs to keep in mind. These 10 best practices for web push notifications apply to you no matter what type of brand you are. From ecommerce companies, to SaaS tools, blogs, membership sites, and more, here is what you need to keep in mind when crafting your web push notification strategy.
1. Customize your opt-in prompt

Let’s start from the beginning! Before you can send anyone a web push notification, they have to opt in. While you can use the standard opt-in prompt, we recommend customizing your prompt to give your potential subscribers an idea of what to expect from your web push notifications.
This is your chance to show the value of your notifications so that your subscribers are more likely to allow your notifications. Will you announce sales, alert of new messages, or deliver breaking news? Clue people in so that they are better informed when deciding whether or not to opt in.
You can learn more about custom opt-in prompts here.
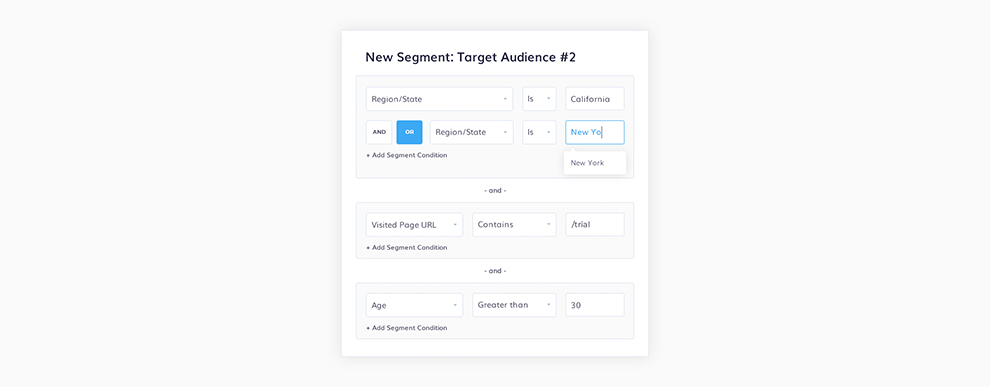
2. Use custom segments
Once you’ve crafted your first web push campaign, the next step is to select your audience! While you can send a notification to your entire audience, that is rarely your best option. Instead, you should make use of custom segments in order to target more specific groups of people.
Your web push platform tracks a lot of relevant information that you can use to segment your audience. Segment according to device type, geographic location, amount of money spent, pages visited, time since last visit, and a lot more. You can read up on all of your segmentation options here.
While your entire audience shares an interest in your brand or website, they are still a unique mixture of people. Segmenting your audience allows you to craft more personalized campaigns that are more likely to resonate and result in a click back to your website. Personalization is not a passing trend in digital marketing, it is here to stay. Make sure you make use of it with your web push campaigns!
3. Create notifications based on browser/device type
Ensuring that your message looks presentable is just as important as what your message actually says. If you aren’t careful, your headline or body content may get cut off as a result of the browser or device your subscriber is using. Thankfully, this isn’t something that is out of your control.
Instead, segment your audience based on their browser or device type. Slight tweaks to your message can ensure it looks good across all screens and browsers. We also recommend placing the most crucial part of your message towards the beginning of your title or body content to ensure it doesn’t get cut off. You can also send test notifications in order to make sure it looks exactly how you want it to.
4. Incorporate action buttons
One of the best ways to measure the success of your web push notifications is by viewing your click through rate (CTR). If not many subscribers are clicking your notifications, you are going to struggle to hit your marketing goal, no matter what it happens to be. One way to help boost your CTR is by incorporating action buttons.
Call to actions (or CTAs) help in just about any marketing situation, and that includes web push. Giving your subscriber a specific goal to complete, as well as an easy way to do it, is a great way to boost your overall web push effectiveness.
For an ecommerce store, you might have an action button that says ‘check out now’ or ‘add to cart.’ If you run a blog, a ‘read more’ button can help inspire your subscribers to click. This gives them an easy clear path and can really work wonders at improving your CTR.
5. Optimize by user timezone
It may be 1 in the afternoon your time, but that is likely not the case for all of your subscribers. To ensure your web push notifications arrive when you intend for them to, make sure you optimize by user timezone. This is a quick and easy way to help ensure you are providing a great user experience for all of your subscribers.
Push notifications that arrive at the wrong time don’t just feel out of place, they can also be incredibly annoying if they arrive at an inconvenient time like super early in the morning or late at night. An annoyed subscriber can easily decide to unsubscribe from your notifications, and you don’t want that! Avoid any mistakes of this nature by simply optimizing by timezone.
6. Make use of triggered campaigns
There are two main types of web push campaigns: manual campaigns and triggered campaigns. You can set up a manual campaign any time you want. Create the campaign, select your audience, and schedule it. Triggered campaigns, however, send as a result of a user’s specific action at your website.
All you need to do is create the campaign and specify what the trigger will be. Once set up, it will trigger and send automatically whenever a subscriber completes the given action. This could be visiting a certain page at your website, opting in to your web push notifications, or abandoning their shopping cart (just to name a few).
Triggered campaigns are highly relevant to your subscribers, making them some of the most effective. They also couldn’t be easier to set up! Automation like this helps to save you time and helps you achieve your marketing goals.
7. Employ personalization
We mentioned personalization earlier when we talked about segments, but there is more you can do to really personalize your web push notifications, and it’s something that all web push users should take advantage of.
Personalization is easily achieved by setting up various custom attributes. These can allow you to add dynamic elements to your notifications, such as a user’s first name. You can also choose to add fallback text in case the custom attribute doesn’t exist for a particular user. This is a great way to add an additional layer of personalization to your web push campaigns.
8. A/B test your notifications
Test various elements of your web push notifications by setting up A/B tests! A/B testing is proven to be one of the best ways to improve things like CTR or conversion rates. Don’t rely on guesswork when it comes to your web push subscribers- test various headlines, action buttons, body text, and more, and see what works best!
A/B testing works best by only changing one element at a time. Test two unique headlines, for example, but keep the rest of your notification the same. If one notification performs better, you can feel confident it was because of the headline change. If you test numerous elements at once, you will have no way to know which caused the increase in performance.
No matter how well your web push notifications perform, there is always room for improvement. Set up some A/B tests and you are sure to increase your campaign effectiveness over time.
9. Utilize custom icons
Visual elements dominate the marketing world these days. Help your web push notifications stand out by incorporating unique visual elements. The best way to do this is by using custom icons. By default, your logo will be used for all your notifications. We recommend adding in some other images into the mix to differentiate different types of campaigns.
Speaking of visual elements, make sure you have fun with your campaigns too and use some emojis to draw attention! Emojis aren’t just fun to use, they actually work well in marketing messages. Push notification open rates improved by 85% when they included emojis.
You can also use large images in your web push notifications, but be aware that they won’t show up for all of your users. Large images only display for Google Chrome users on Android mobile devices or on Windows desktop devices.
10. Track your conversions
Finally, in addition to tracking your CTR, you should also absolutely track your conversions that result from your web push campaigns. If you are an ecommerce brand, you can track sales that result from a web push campaign. In other cases, you can set up other custom events as your conversion and track how well your web push campaigns perform.
Seeing how many users click your campaigns is helpful, but to really analyze how well your web push campaigns are performing, you need to enable conversion tracking. If you’ve got a good CTR but a low conversion rate, you’ve got a problem. Track your conversions and tweak your campaigns as needed to help boost your conversion rate.
Wrapping Up
No matter what you company looks like, if you’ve made the decision to get started with web push, you need to keep these things in mind. These 10 best practices for web push notifications will help ensure your campaigns are successful and result in a solid increase in both traffic and conversions by optimizing your web push experience at each stage of the process- from opting in, to the notifications themselves, to your analytics.
All you’ve got to do now is get started! Thankfully, you can be up and running with web push in as little as 5 minutes. Better yet, you can get started for free with Aimtell, or learn more about web push by reading our Beginner’s Guide.
GET STARTED FREE
Tags:
best practices for web push notifications*, content strategy, web push, web push notifications.