We hope you all are ready for some new features! Our team has been hard at work at several new updates and overall improvements to our platform. There is plenty to get to so we won’t waste any time, let’s get into what we’ve been up to!
Triggered Campaign Event Label Improvement
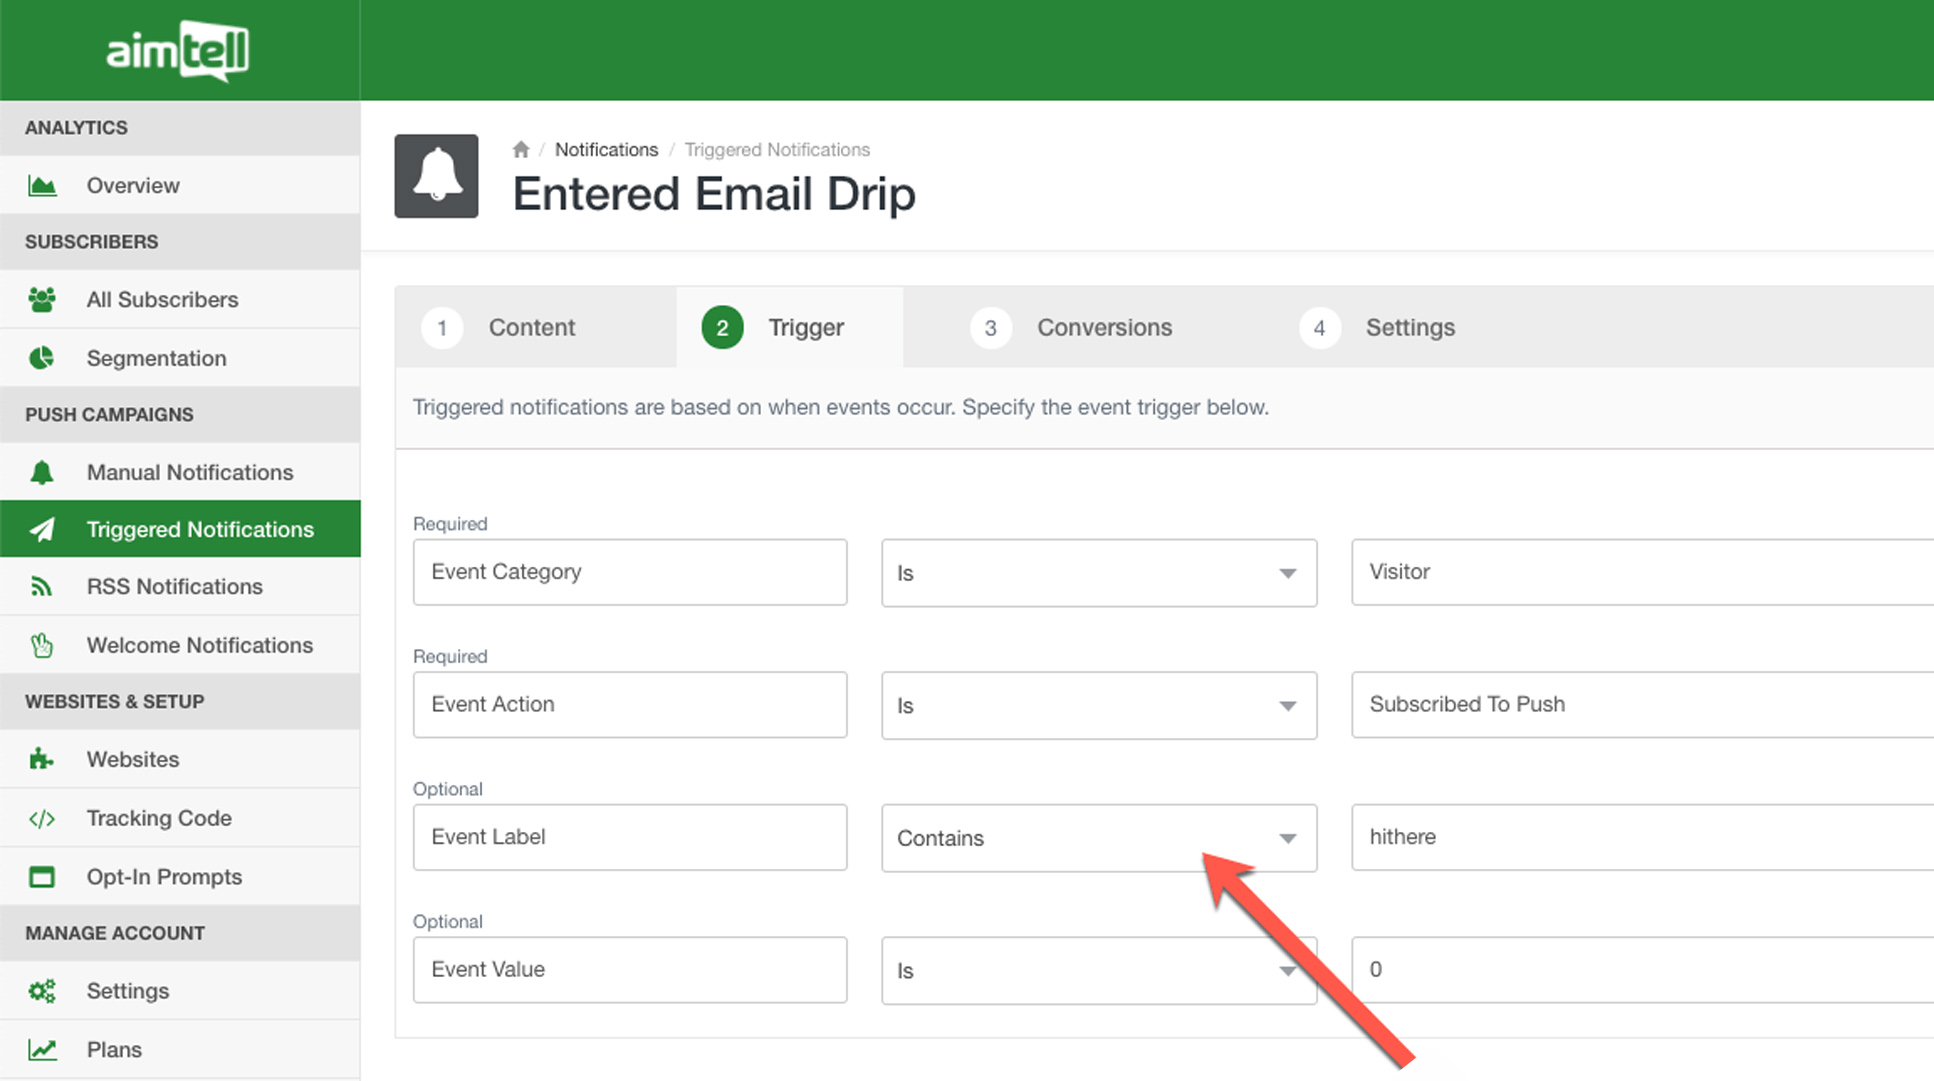
This first update we are really excited about, as it gives you even more control over the powerful triggered notifications that you send. You already know that to set up a triggered campaign, you have to specify the trigger. This involves a required category and action, but can also include an optional event label. We’ve added the ability to set this label as ‘contains’ in order to give you more control over what specifically triggers your notification.

For example, many web push users wish to target their subscribers who download content from their website. Previously, you had less control over grouping various types of content, say content from your blog, case studies, and more. Here are two events you might wish to track:
Event one:
- Category: PDF
- Action: Downloaded
- Label: URL (for example, mysite.com/blog/new-features)
Event two:
- Category: PDF
- Action: Downloaded
- Label: URL (for example, mysite.com/case-study/blue)
Previously, a triggered campaign would trigger either way in this situation. Now, you can set the event label as ‘Contains’ and put something such as “/blog” in order to have the trigger go off just for subscribers who download something from your blog. You could then have a separate trigger go off for subscribers who download a case study.
This will allow you to create even more targeted and relevant triggered campaigns for all different types of events you set up to track. You’re sure to see a nice increase in CTRs from this update!
Webhook Variables
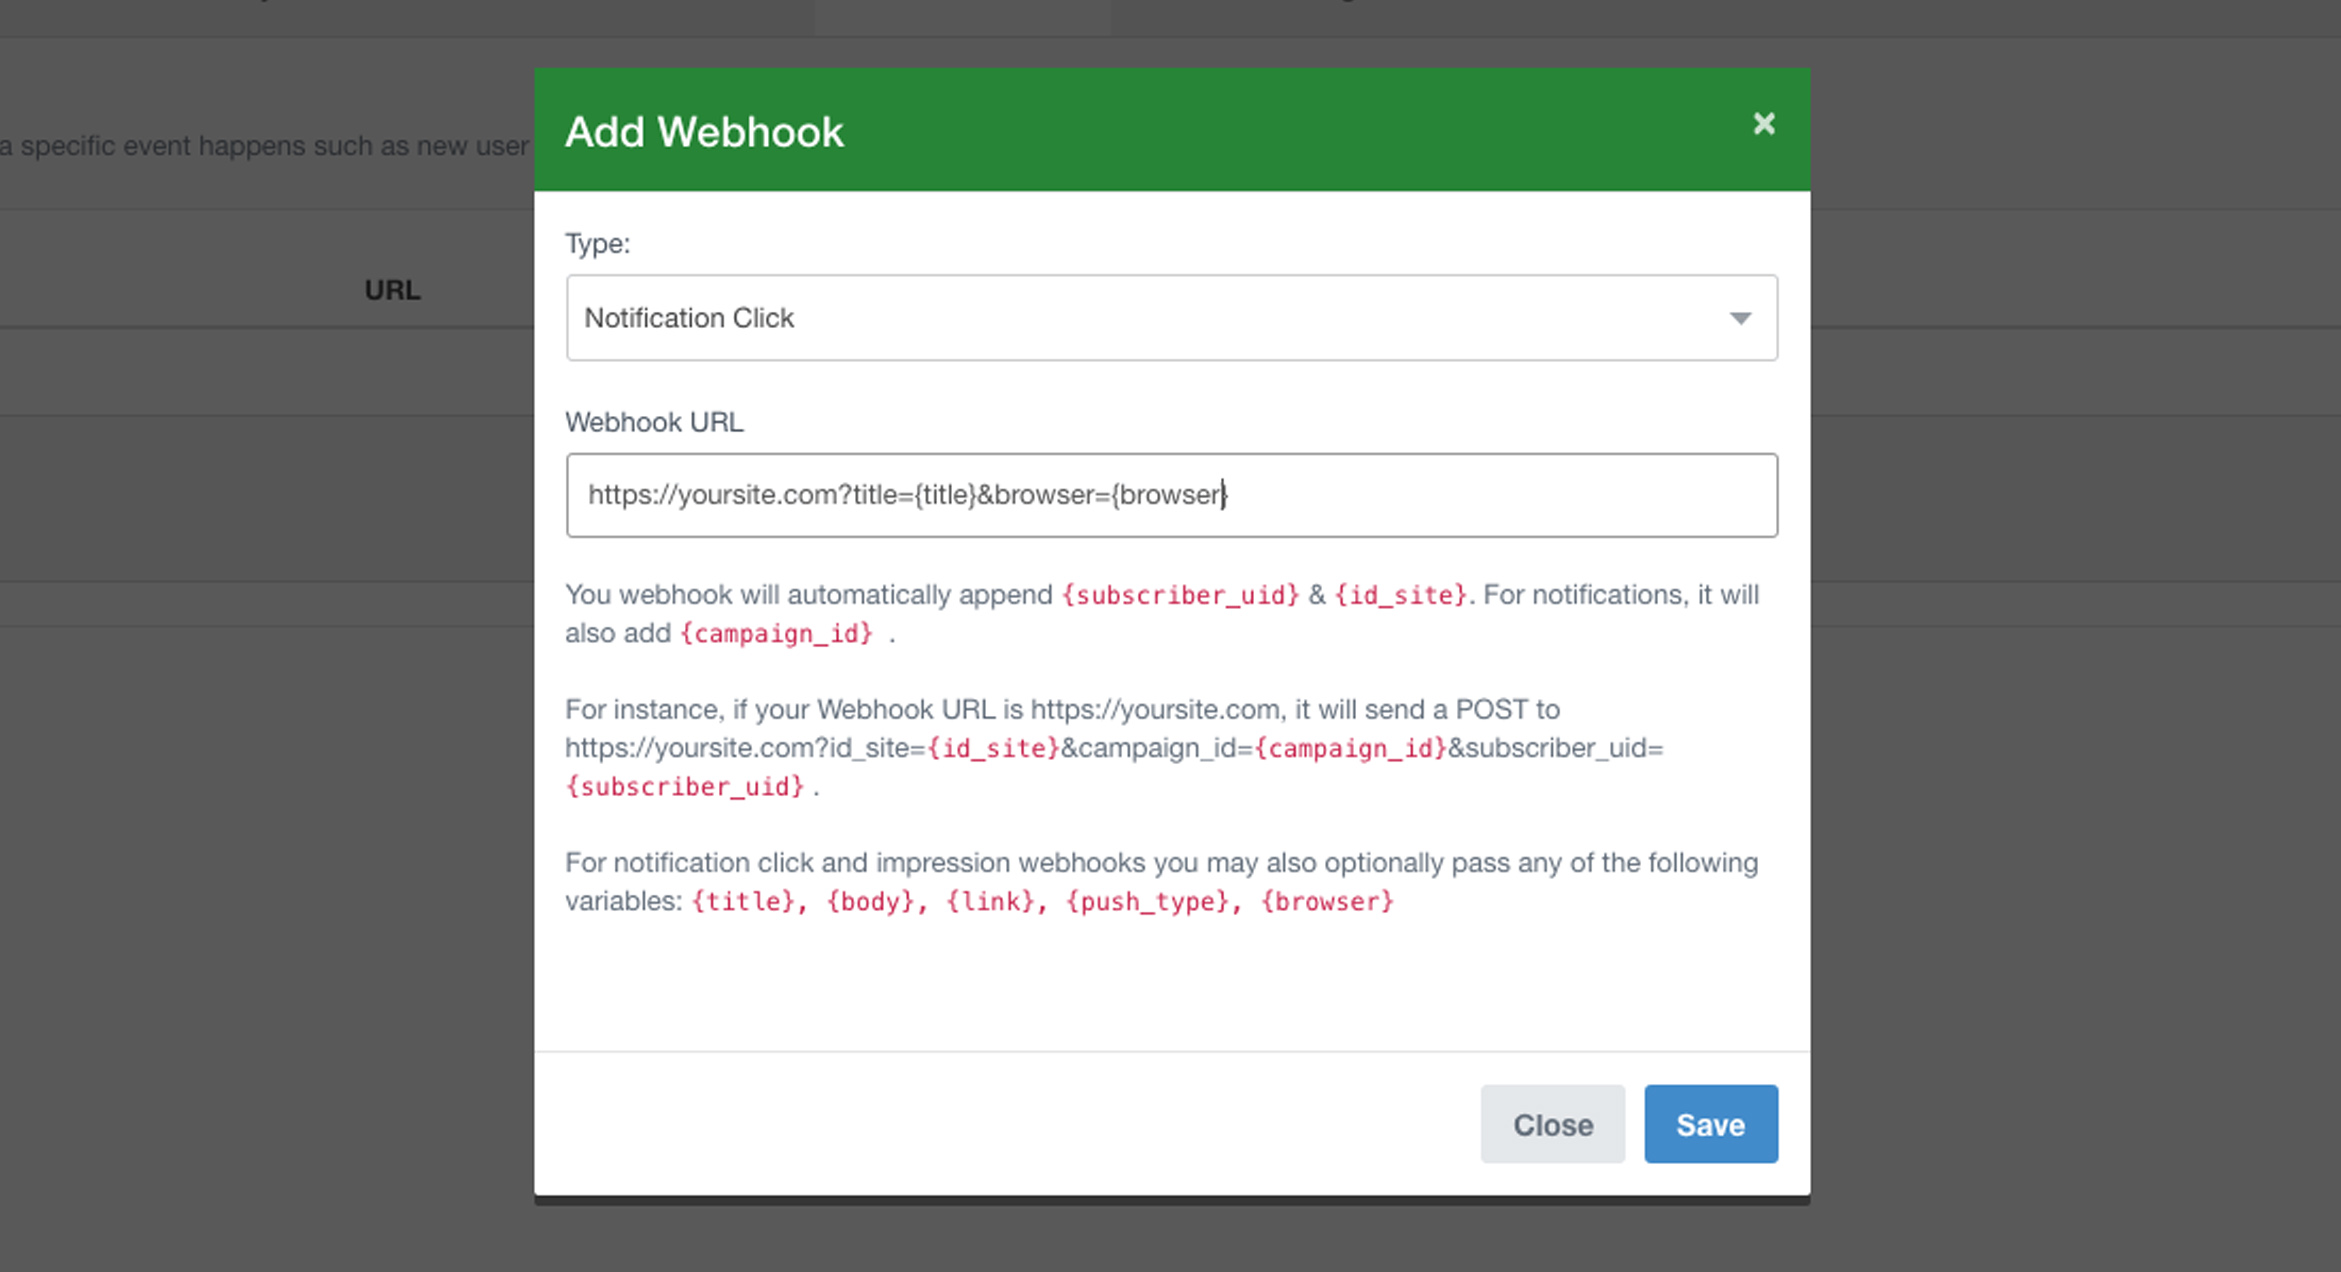
We’ve made some nice improvements to our webhooks since releasing the feature earlier this year. Now, when adding a new webhook, the subscriber ID and site ID will automatically be appended. The campaign ID will also be automatically added when setting up a notification webhook.
 You’ve also got the ability to add in some additional variables for notification click or impression webhooks. Optionally add in the title, body, link, push type, or browser to your webhook.
As a reminder, adding a new webhook is easy. Navigate to ‘Websites’ in the sidebar, select edit next to the website you wish to set up a new webhook for, and click webhooks from the top menu. You can edit any existing webhooks or easily add a new one.
Head to our webhooks documentation for more information on the types of webhooks you can set up.
New Variable Options
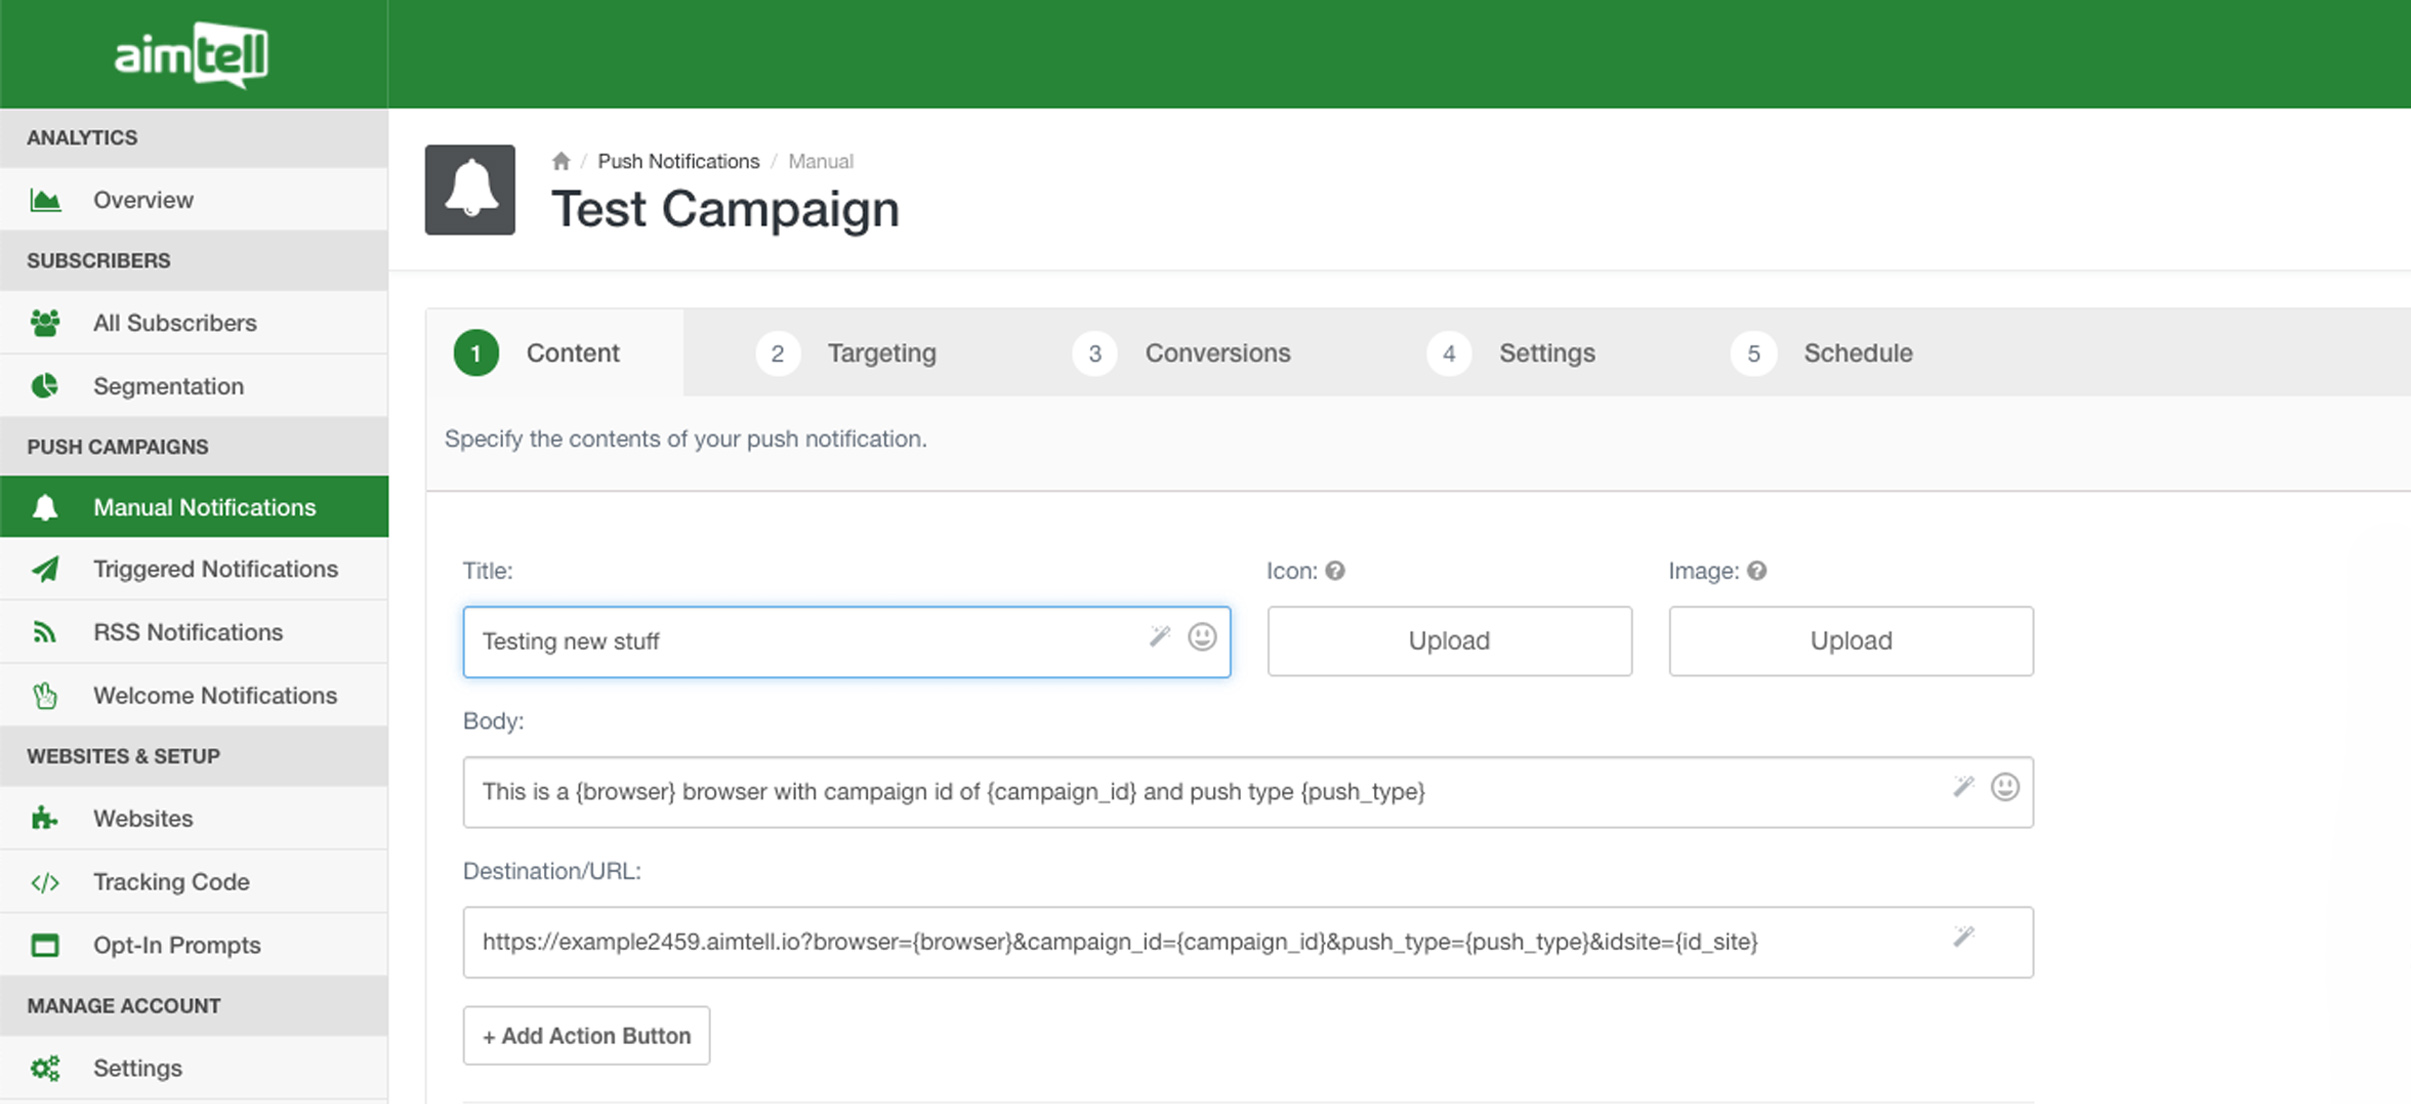
You’ve already got the ability to pass generic variables into your web push notifications, such as the date or day of the week. You’ve now got some additional variables you can choose from! Now you can also easily add in the campaign ID, push type, or browser.
 You can always refer to our generic variables documentation for a complete list of options that you have available to you. Remember that you can use these variables in any part of the notification, including the URL. This can be helpful when tracking campaigns and seeing which types of campaigns are performing better than others.
Variable Suggestions
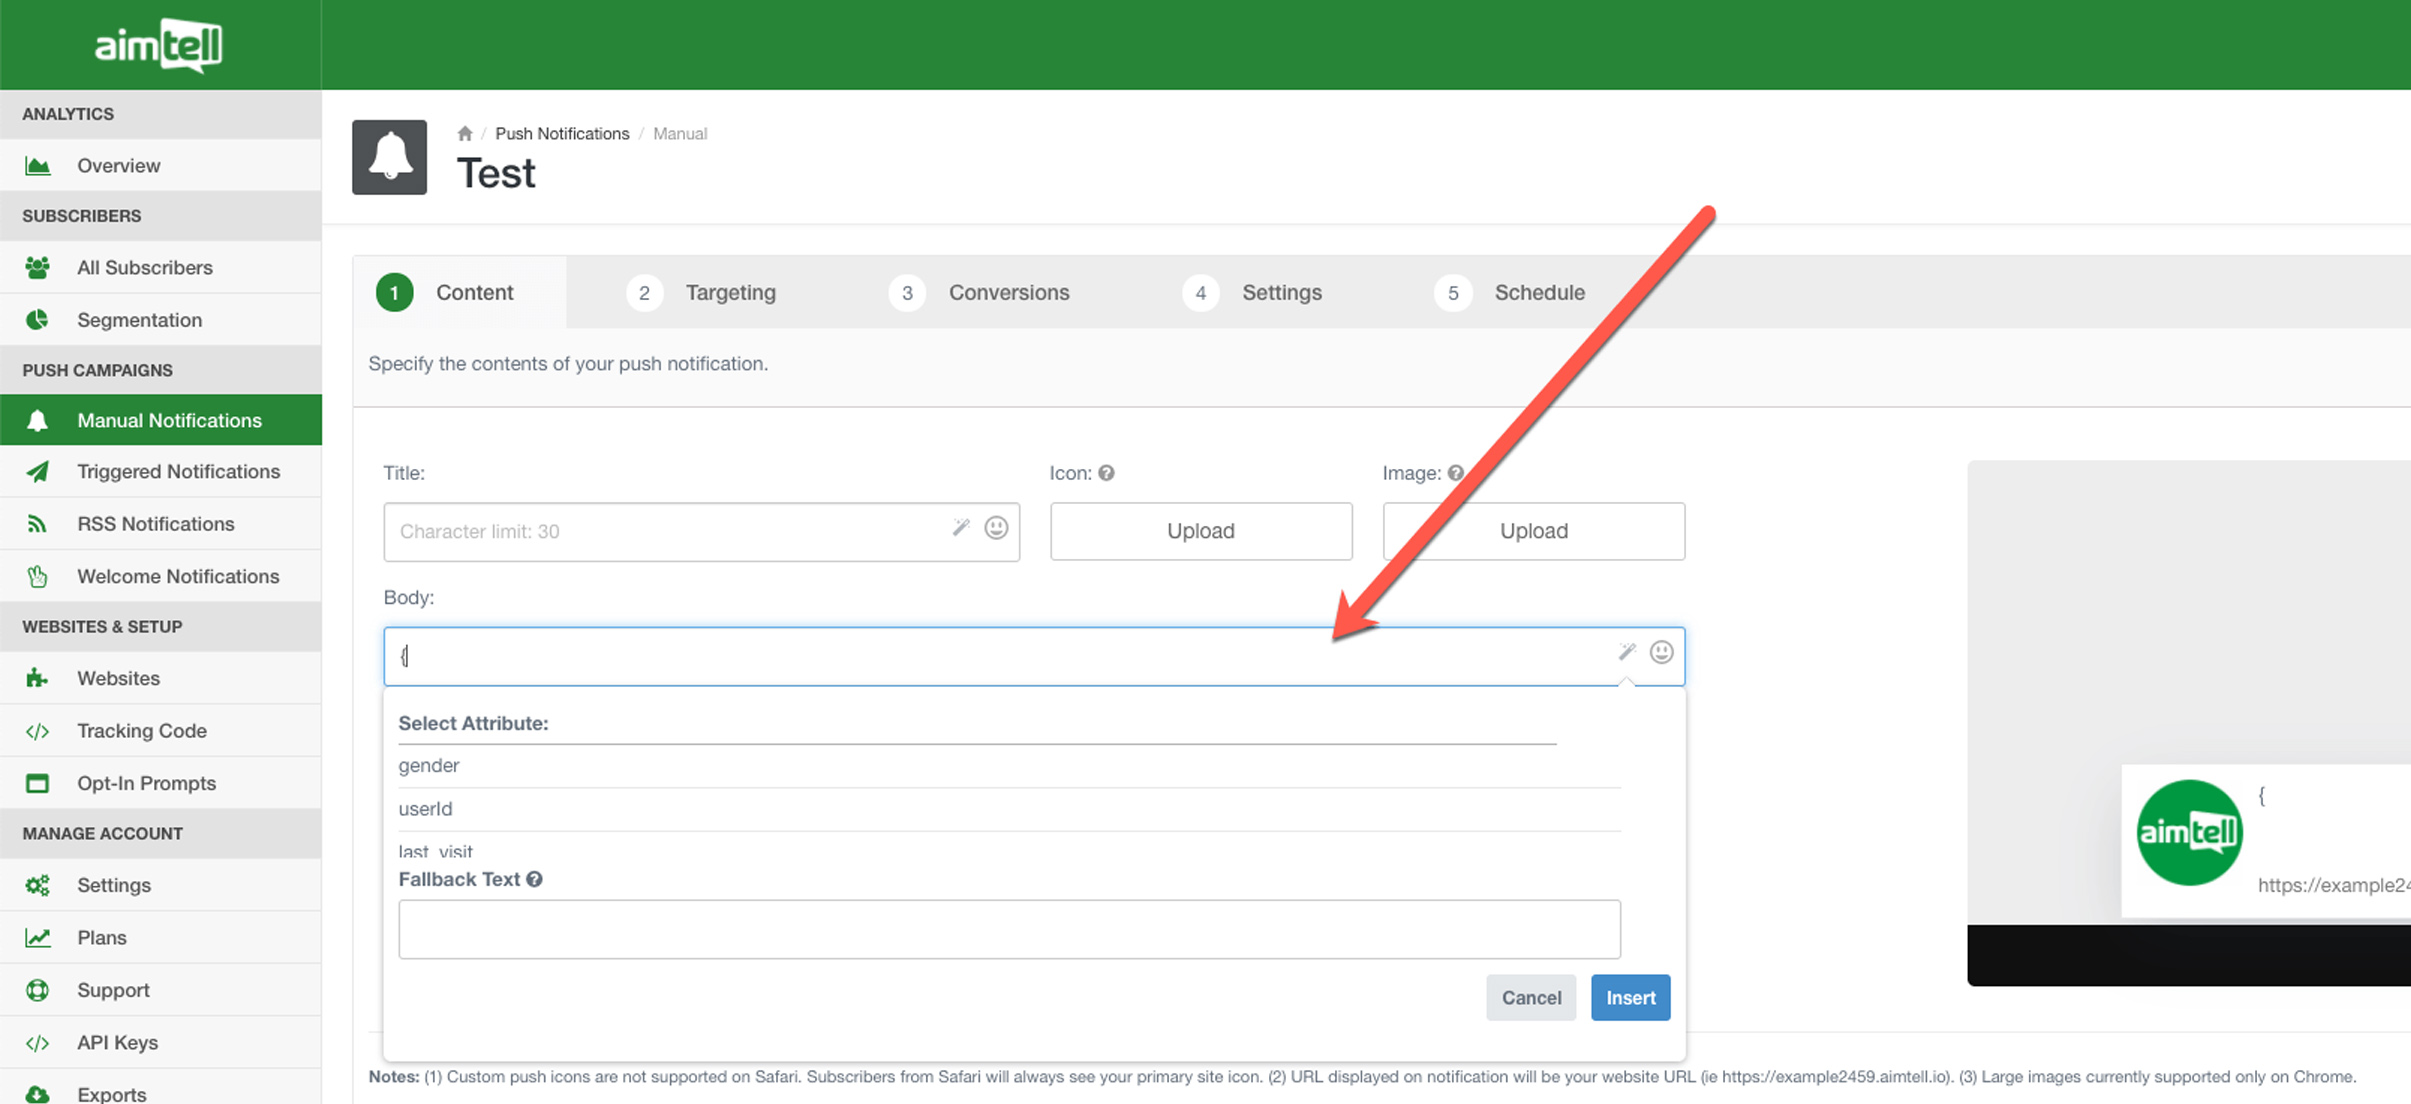
Speaking of variables, we’re also making it even easier to use them! You should absolutely be taking advantage of these in order to add some dynamic content into your web push campaigns. You’ll now notice that we’ve added them to the dropdown list so that you can easily select what you are looking for.
 Simply select what you want from the dropdown menu and keep building your campaign! Type a curly bracket { to bring up the dropdown list.
Service Worker Update via Cache Options
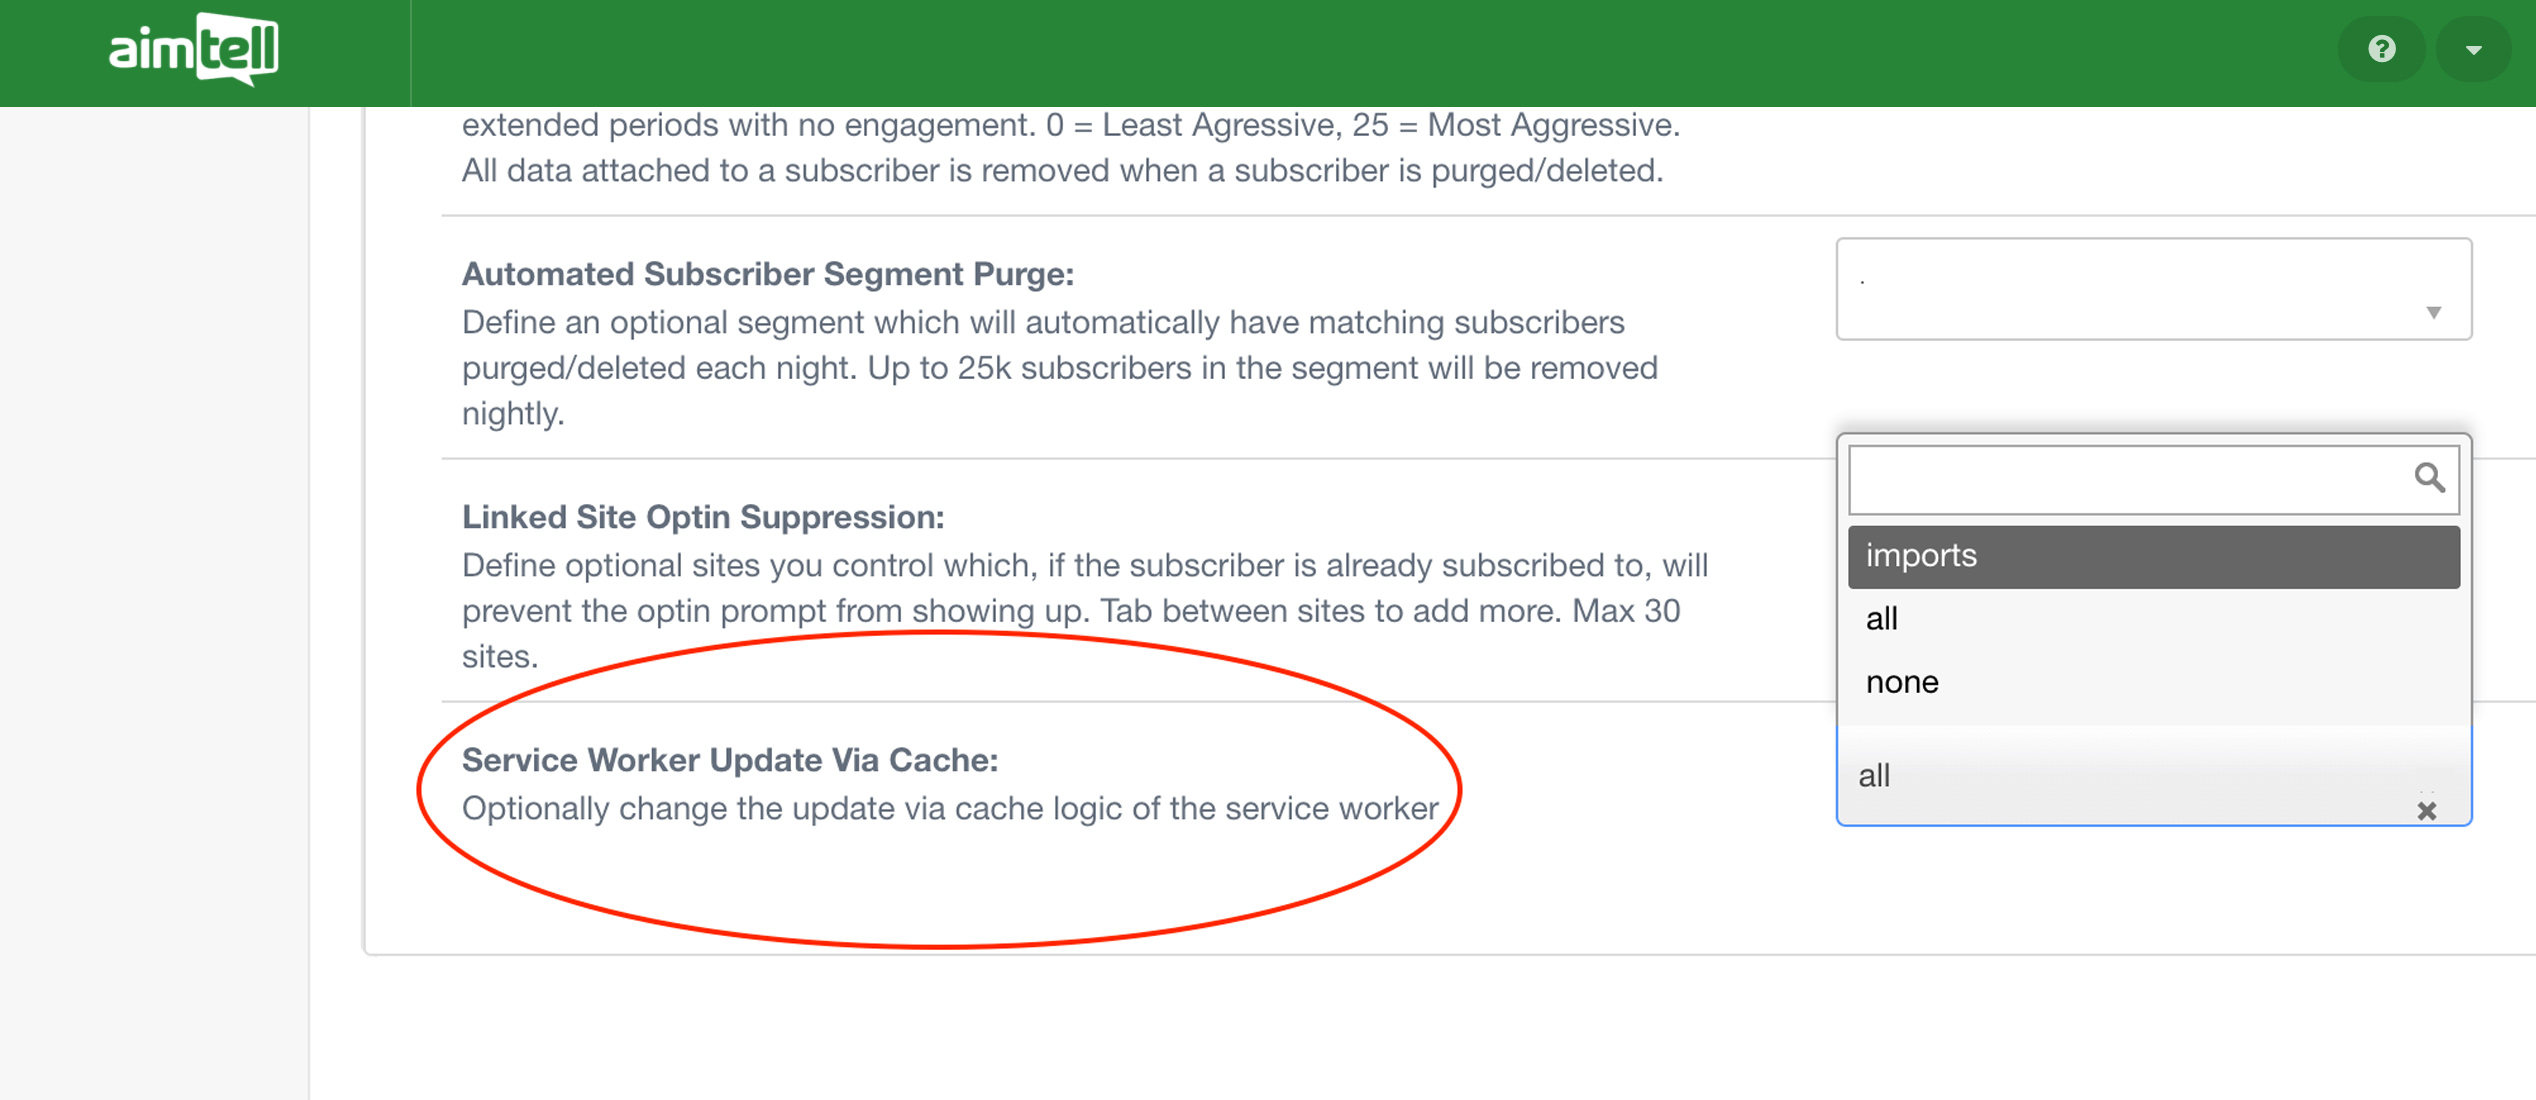
Everyone now has the option to easily change the update via cache logic of the service worker for any site you have added to our platform. You can find this setting by heading to ‘Websites’ in the sidebar, selecting edit next to the website you wish to update, and then scrolling to the bottom of the ‘Misc Settings’ tab.

The settings you pick will impact just the website you have selected, not each website you have on your account. Which option you select determines if and how the browser’s standard HTTP cache comes into play when making the HTTP request to check for updated service worker resources.
There are three options to choose from:
- Imports: This is our recommended and default setting, which ensures that you always have our latest and greatest code. It will involve a few extra hits on your server to our service worker.
- All: With this setting, assuming you have HTTP caching set up at your server, there will be dramatically less calls to your server. In most cases this is fine, however if you have set your cache refresh to something longer, say a week, you would have to wait that period of time before your subscribers would have any new features we release become available.
- None: There are no real reasons to select this. In this instance, all freshest codes are shown, but at the cost of extra hits to both your server and to ours.
API Analytics Endpoints
We have released several new API endpoints! Here’s a quick overview of the new endpoints that are available now:
- Analytics (over time): This mimics the analytics tab in the dashboard. It allows you to see things like new subscribers, notifications sent, notifications clicked, and opt-in rate.
- Analytics All Sites (over time): Similar to the Analytics endpoint, but this lets you pull from all your websites and aggregate it.
- Manual Campaigns (batch/bulk): This allows you to create, update, or delete up to 100 campaigns at one time.
- Triggered Campaigns (batch/bulk): This allows you to create, update, or delete up to 100 campaigns at one time.
Head over to our developer documentation for more information.
Other Updates
While those are the main updates we wanted to share with you all, there are a few other improvements we wanted to mention as well:
- Export conversions list: Head to any campaign where you are tracking conversions and under the conversions tab you’ll see a new ‘download results’ button. Use this to easily export a CSV file of all the conversions from that particular campaign.
- Download segmentation list: Easily download your entire segment list. Head to your list of segments and from the options drop down menu select download segment(s).
- Bulk delete segments: You now have the ability to bulk delete segments. Select which segments you wish to delete and hit delete segment(s) from the options drop down menu. You will be alerted if you attempt to delete a segment that is currently being used in a repeating or triggered notification.
- Show event variables logs: Head to the logs section of your dashboard and you will now see a new event variables column that will show the exact variables you set up for each event that you set up to track.
- Editable campaigns in S2S postback conversion: We currently offer the ability for you to add a Server to Server postback to measure conversions that occur on a campaign. Previously this was created on a campaign level with a set value, meaning you’d get a link you could use for a postback which would track a standard value to a single campaign (not very dynamic in nature). With this update you can now pass/modify the URL to dynamically change the campaign ID and/or conversion value.
- Test notification improvements: Test pushes are important for many of you to ensure your campaigns look and perform the way you want them to. Previously, when sending a test push it came from our dashboard.aimtell.com*. Even though you were building out a campaign of your own, when hitting ‘send push’ the push would show from “aimtell.com.” Additionally, there was no support for testing action buttons. We have updated the system so that when you send a test push, it actually comes from your site. Additionally, you can test all features of the push, including all personalization abilities and action buttons.
*Note: Actual push notifications you send have always come from your site address. This update only addresses dashboard test pushes which previously came from aimtell.com and now will come from your site address.
Wrapping Up
That’s it for now! There is plenty here to keep you busy and as always, if you have any questions you can always reach out to us and someone from our team will be happy to assist you. We love hearing your suggestions for new features so keep those coming as well.
For those of you who are new to web push and want to get started, you can start your free trial with Aimtell or learn more about web push by reading our Beginner’s Guide.
GET STARTED FREE
Tags:
product feature, triggered campaign improvements*, web push, web push notifications.


 You’ve also got the ability to add in some additional variables for notification click or impression webhooks. Optionally add in the title, body, link, push type, or browser to your webhook.
 You can always refer to our
  Simply select what you want from the dropdown menu and keep building your campaign! Type a curly bracket { to bring up the dropdown list.