The Beginner’s Guide to Aimtell

Getting Started with Aimtell

Chapter 1
Installing Tracking Code
Chapter 2
Collecting Subscribers
Chapter 3
Creating Segments
Chapter 4
Sending Push Notifications
Chapter 5
Campaign Results

Chapter 1
Installing Tracking Code

Chapter 2
Collecting Subscribers

Chapter 3
Creating Segments

Chapter 4
Sending Push Notifications

Chapter 5
Campaign Results
BOOK A DEMO TODAY

CHAPTER 1

Installing Tracking Code

CHAPTER 1

Installing Tracking Code

In order to start collecting website push subscribers and be able to send notifications, you’ll first need to install Aimtell. Fortunately, installing Aimtell is incredibly easy and there are several ways you can install it.

Select Installation Method:

Install Manually via Javascript

The most common way to install Aimtell website push notifications is manually. While this process is slightly more involved than using our app or plugin, it is still very simple and only involves adding our tracking code via a few lines of javascript and uploading a file to your root directory. 

Step 1) Add Your Website

To add a website to your Aimtell account log into your dashboard (https://dashboard.aimtell.com/login) and go to “Websites” > “Add Website”.

Adding Your Website in Aimtell
 

At this point you are presented with three areas to fill out:

Icon – the default image you want to use for your push notifications. You’ll be able to change it per campaign, but this will be a fallback.

Name – a custom name for your site (this is shown to users on certain browsers such as Safari)

URL – the URL of your site (be sure to include “https://” such as “https://aimtell.com“)

Step 2) Upload the tracking code to your website

As you continue to the next step you’ll be shown the tracking code associated with your newly added site. Copy and paste the snippet on the footer of every page you wish to track (note: you must install this on the homepage in order to properly work).

You’ll also need to download the required aimtell-worker.js file and upload it to your sites root directory. (for instance, if your site is https://yoursite.com, it should be accessible at ie https://yoursite.com/aimtell-worker.js)

Installing Aimtell with Javascript

After following the information above, click “Create”. Our software will prepare all the requirements on your behalf and in a few seconds your site will be created.

That’s it! Now your website should start prompting visitors to subscribe when they visit it.

Note: you can find your tracking code and worker file at any time by logging into your dashboard and going to Websites > View Websites > Edit > Tracking Code.

CHAPTER 2

Collecting Subscribers

CHAPTER 2

Collecting Subscribers

Once you’ve installed Aimtell, anyone who comes to your website will automatically receive a prompt asking if they’d like to receive notifications from you. This is the default (and recommended) behavior to get the highest opt-in rates. However, it’s not uncommon that you may want to show some additional context as to why people should subscribe or add logic as to when you want to ask them. To do so, you can use our “Prompt Management Tools”

In this quick example, we’ll show you how to create a custom opt-in prompt

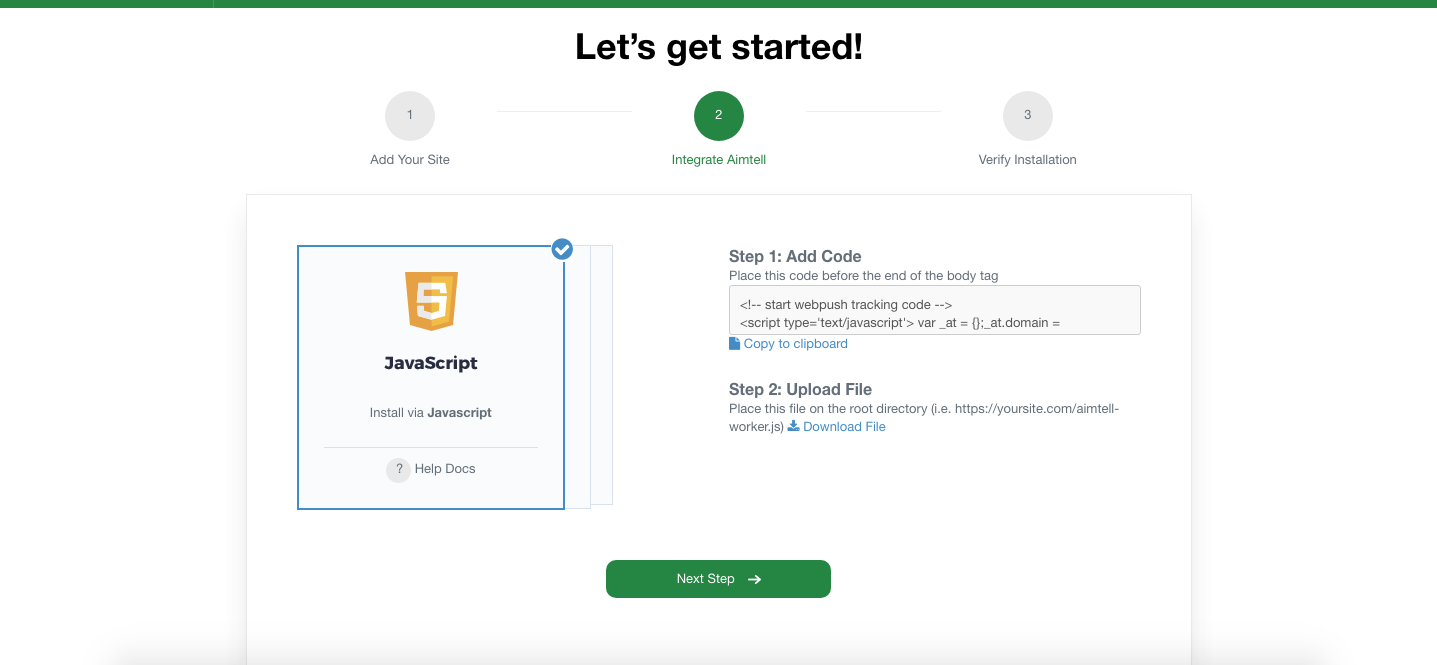
First, head over to  “Websites & Set Up” > “Opt-In Prompts”

This will take you to a selection of either using the Native Optin Prompt or a Custom Optin Prompt for your website. Select ‘Custom Optin Prompt’

Aimtell - Site Information

Once you select ‘Custom Optin Prompt’ a drop down of Custom Optin Prompts that you have created will be displayed. If you have not created a Custom Optin Prompt and would like to create a new one, click on the blue text that says ‘Create/Manage Custom Optin Prompts’.

This will bring you to the page where you can manage your custom prompts. If you would like to create a new custom prompt, click on the blue button that says “Add Custom Prompt”.

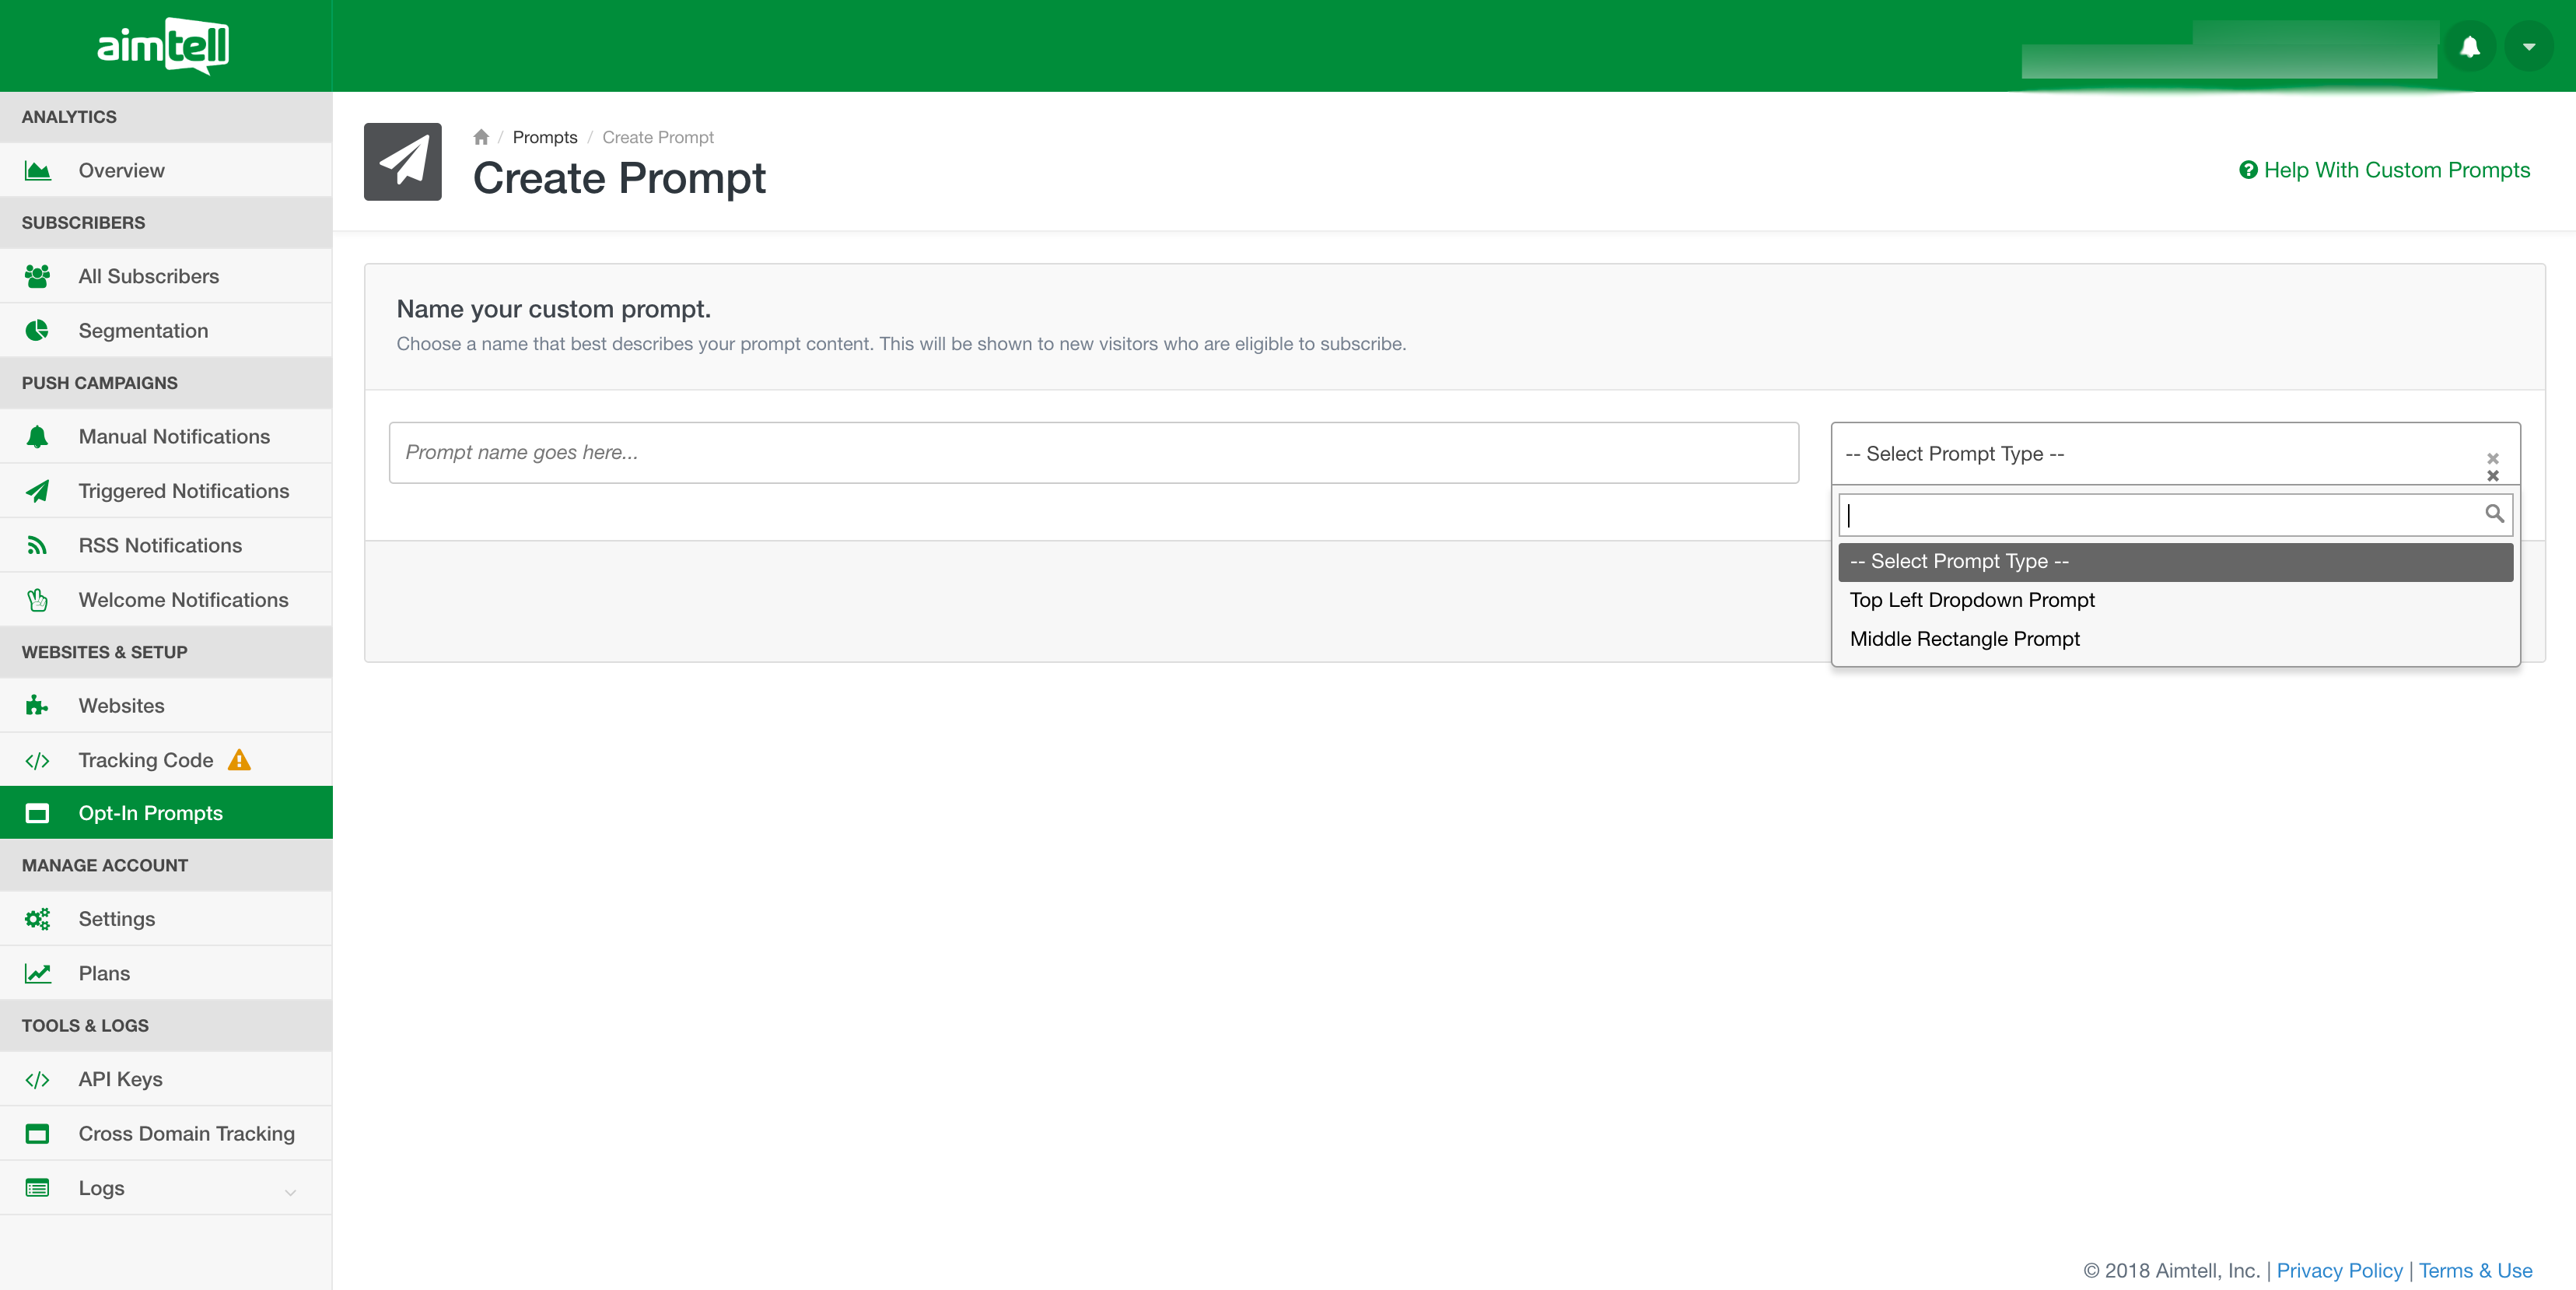
On this screen you will can fill out a name for your Custom Prompt and you have a couple design options to choose from: “Top Left Dropdown Prompt”, and “Middle Rectangle Prompt.”

For the rest of this guide we will be using the “Middle Rectangle Prompt” example.

Give your prompt a name, then click on ‘Create Prompt’.

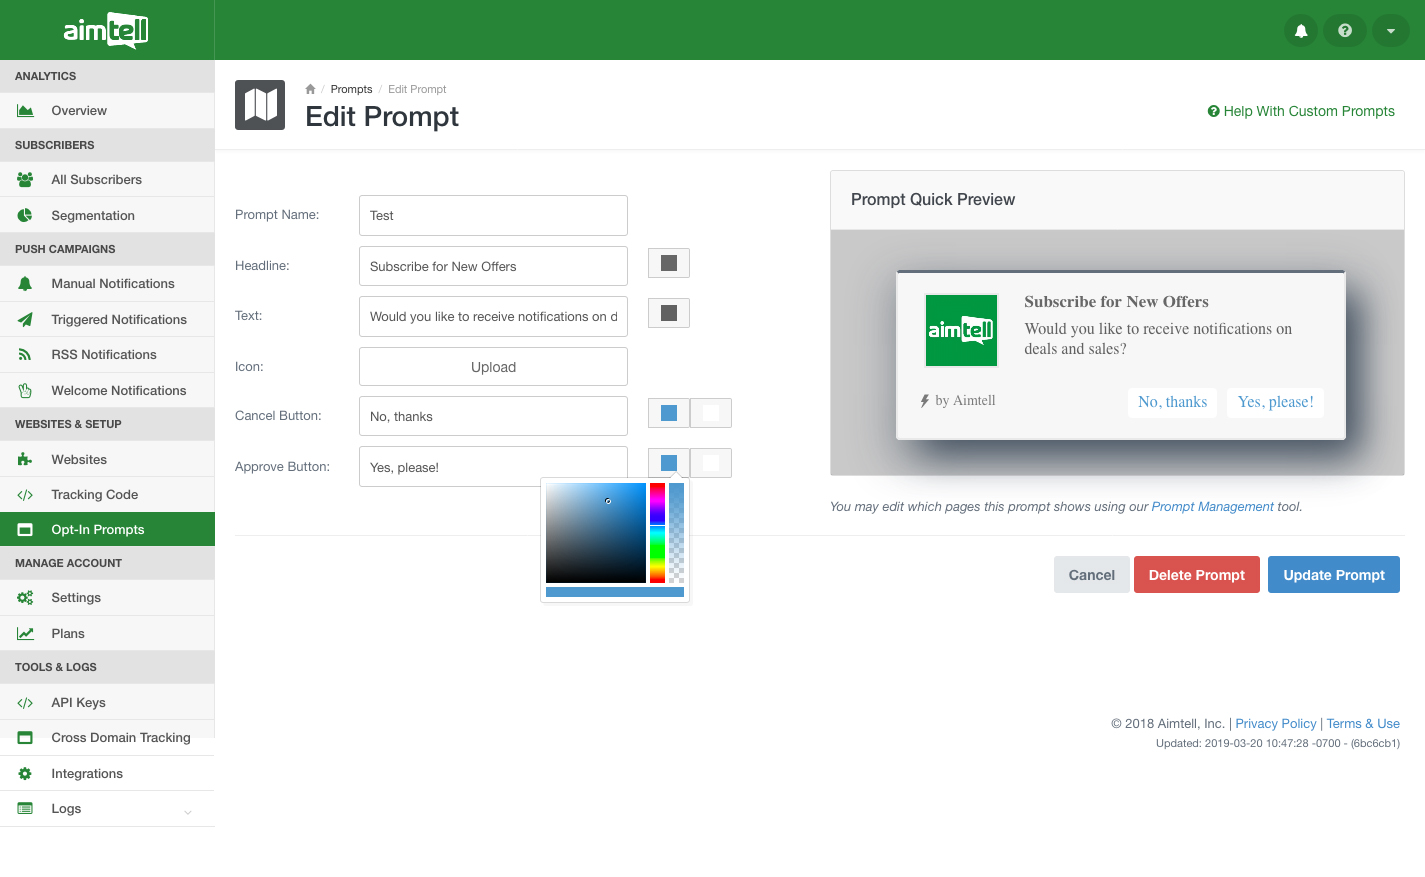
Our Middle Rectangle custom prompt design allows you to create your own headline, body text, button text AND you can upload your own personal icon. You can also choose the font colors for these elements as well.

As you input your information, the Prompt Quick Preview will automatically update to reflect your changes. The preview displays exactly how the notification will display to your users, so make sure you are happy with how the prompt looks before finishing.

Aimtell

The colored squares are what you select to change the font colors. The second squares next to the Cancel and Approve buttons allow you to select a background color for the buttons.

When you are happy with your prompt, click ‘Update Prompt’.

Aimtell

Now that you’ve created your custom prompt, you’ll need to specify when it should show to your subscribers. To do so, simply head back to “Optin Prompts” and select an option from the dropdown. by clicking ‘Edit’ next to the prompts you’ve created.

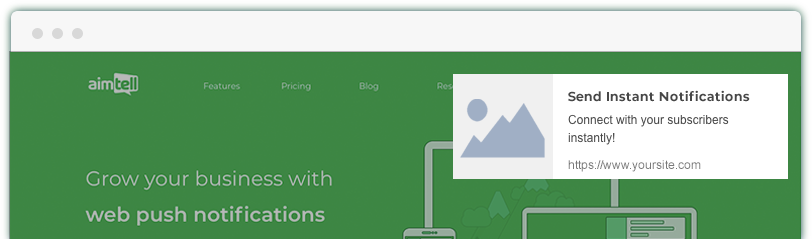
Here is an example of what your Middle Rectangle Custom Opti-in Prompt will look like:

Aimtell

CHAPTER 3

Creating Segments

CHAPTER 3

Creating Segments

Segments are a very powerful feature. It let’s you get as broad or as granular as you want with your push notifications. With segments you can create groups of active subscribers off a variety of conditions such as their geographical location, links they visit, or last time they viewed your website.

In this example we’ll show you how to create your first segment

First, head over to “Targeting” > “Add Segment”

Our smart audience segmentation tool gives you the option to easily create powerful segments of people based on multiple conditions. Keep in mind the more specific your audience is, the more success you are likely to have with your campaigns, so smart segmentation is a must.

Aimtell Segmentation

If you have not created any, you may notice some sample segments created for you. These should give you a good idea of the types of segments you can create.

Aimtell Segmentation

You may select Edit to the right of any of the segments if you wish to use them. Or, if you want to create a new segment, select the blue ‘Create Segment’ button at the top right of the screen. This will open the ‘Add Segment’ page and is where you create your new segment.

Aimtell Segmentation

There are numerous categories for creating a segment listed in the first drop down including Page Views, Visit, Location, Campaign, Device Info, Custom Events, and Custom Attributes. Simply select the drop down for the section you wish to use for your segment and type in the necessary information.

Aimtell Segmentation

Input the information you want and then click ‘Save Segment.’ You may input as many conditions as you want. This procedure works for any of the sections you choose. Simply click on a tab and input your desired conditions.

You can also target people based on several different conditions. For example, you can set an OR condition in order to target people in different locations (California, Virginia, and Georgia for example) who also meet other requirements, such as visiting a sale page at your website and whose gender is female.

Aimtell Segmentation

To see how your segment changes over time or see which individual subscribers match your segments, you can also view the results by clicking ‘View More’ next to your segment.

Aimtell Segmentation

From here you can download the report of your segment, or the subscribers specific to this segment.

That’s it! Existing users who meet the criteria will instantly be added to the segment, and new users will automatically be included if they meet the given criteria.

CHAPTER 4

Sending Push Notifications

CHAPTER 4

Within Aimtell there are several ways you can send notifications ranging from Manual Capmaigns, Triggered Campaigns, Welcome Notifications, RSS Feed Notifications, API Notifications and so on. However, the easiest to get started with are Manual Campaigns.

Manual Campaigns are push notifications that you manually prepare and send out to a certain segment of subscribers at a predefined time period. In this example we’ll show you how to create your first campaign

First, head over to “Notifications” > “Manual Notifications”

On this screen, your are presented with multiple options to customize your notification. To help you get a better understand, we’ll walk you through each one.

Content

The content tab is where you specify the information of the push notification including title, icon, image, description, and destination url. On this screen you’ll also be able to preview how your notification looks like and send yourself a quick test push.

There are tons of advanced features within this tab including dynamic notifications and A/B testing, but to start simply leave those as-is.

Aimtell Sending a Push Notification

Targeting

The targeting tab lets you select which segments of subscribers you want to send your notifications to. Subscribers who are included in more than one list receive only one notification.

Aimtell Push Notification Targeting

Conversions

The conversions tab let’s you define if you want to listen for any additional events on your site and mark them as a conversion. By default Aimtell will track number of notifications sent and clicked, but by setting a conversion you can also measure things like “Items Purchased” or “Forms Submitted”. That said, you’ll need to start tracking events first to take advantage of this, so simply leave it as-is.

Aimtell Push Notification Conversions

Settings

The setting tab allows you do specify various additional (and optional) settings for your campaign. For instance, you can define how long your push should be valid for before it “expires”. This is often useful for time-sensitive promotions. For instance, if you send a push for a one-day only sale, you may not want someone to get your push if they were away from their computer on vacation for the past week.

Aimtell Push Notification Settings

Schedule

Finally, the schedule tab lets you set a time/date for your campaign to go out. Campaigns should be scheduled at least 5 minutes out.

Aimtell Push Notification Scheduling

CHAPTER 5

Campaign Results

CHAPTER 5

Campaign Results

While there are several ways to see how your push notifications are performing, the most commonly used one will be the reporting within each individual campaign.

To view the results of a campaign head to “Manual Notifications”, “Triggered Notifications, or “RSS Notifications” then find your campaign in the list. Once you have found the desired campaign click “View Results”.

Aimtell Conversion Screen

Once on the results page, you will notice a quick preview of your notification, snapshots of total number of notifications sent, clicked, and conversions. If you were tracking conversions, you’ll also see a breakdown of every single conversion and the subscriber that is attached to it.

You’ll also be able to view additional insights on your campaign such as daily notification sent breakdown, campaign details (ie links, segments, etc) and conversions that resulted directly from your push. Please note that conversion tracking is currently only available for our “Basic” and above plans.

Aimtell Conversion Screen
There you have it!

You should now have a pretty good understanding of what website push notifications are and how to send them. If you need any help, please be sure to check out our extensive documentation center or reach out to support.

GO TO DASHBOARD

 Serious about security & privacy
 Your subscribers, your data